Spring 프레임웍에서 제공하는 Oauth2 프로젝트를 이용하여 Oauth Authorization Server를 구축해 보겠습니다. Oauth Authorization은 클라이언트가 서비스 제공자로부터 회원 리소스를 제공받기 위해 인증 및 권한 부여를 받는 일련의 절차라고 보면 됩니다.
이를테면 페이스북이나, 구글, 카카오톡 등이 대표적인 서비스 제공자인데요. 해당 서비스에 로그인하고 제휴한 앱에 회원정보 접근을 승인하는 과정을 제공하는 것이 Authorization 서버입니다.
즉 이번에 실습하는 것은 클라이언트가 아니라, 페이스북 같은 서비스 제공자를 만들어보는 실습이라고 보면 됩니다.
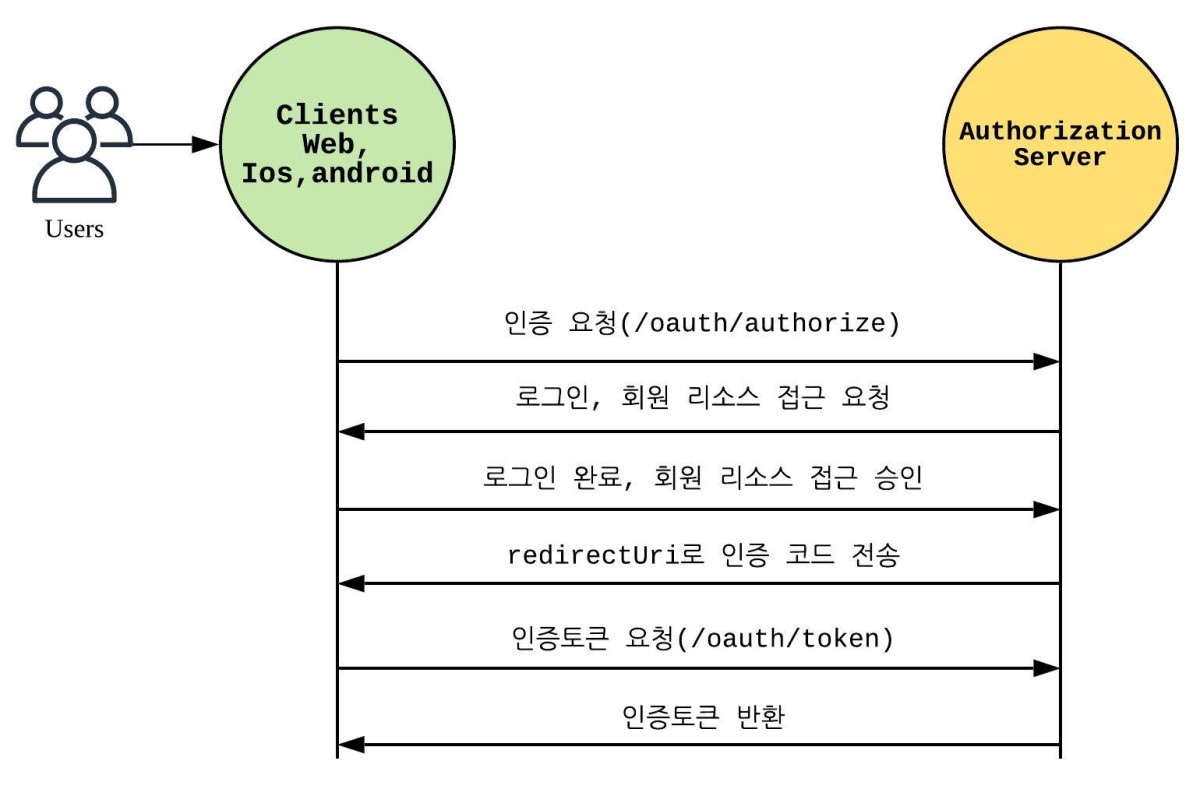
authorization 서버의 인증 타입은 총 4가지가 있으며, authorization_code 타입이 가장 대중적으로 이용됩니다. 아래는 authorization_code 타입 인증의 대략적인 Flow입니다. 아래 내용 중 로그인은 Authenticaion이라 하고 로그인 후 회원의 리소스를 접근할 수 있도록 권한을 부여받는 것을 Authorization+AccessControl 이라고 합니다.
최신 소스는 아래 GitHub 주소를 참고해 주세요.
https://github.com/codej99/SpringOauth2AuthorizationServer.git
Spring gradle 프로젝트 생성
프로젝트 초기 세팅은 아래 링크를 참고하시면 됩니다.
신규 프로젝트를 초기 구성하는데 어려움이 있다면 Spring initializr를 통해 간편하게 프로젝트를 생성할 수 있습니다. 다음 포스팅을 참고해 주세요.
향후 DB연동을 위해 사용할 H2에 대한 내용은 아래 포스팅을 참고해주십시오.
gradle.build 내용 수정
plugins {
    id 'org.springframework.boot' version '2.1.4.RELEASE'
    id 'java'
}

apply plugin: 'io.spring.dependency-management'

group = 'com.rest'
version = '0.0.1-SNAPSHOT'
sourceCompatibility = '1.8'

configurations {
    compileOnly {
        extendsFrom annotationProcessor
    }
}

repositories {
    mavenCentral()
}

dependencies {
    implementation 'org.springframework.boot:spring-boot-starter-data-jpa'
    implementation 'org.springframework.boot:spring-boot-starter-web'
    implementation 'org.springframework.cloud:spring-cloud-starter-security:2.1.2.RELEASE'
    implementation 'org.springframework.cloud:spring-cloud-starter-oauth2:2.1.2.RELEASE'
    implementation 'com.google.code.gson:gson'
    compileOnly 'org.projectlombok:lombok'
    runtimeOnly 'com.h2database:h2'
    annotationProcessor 'org.projectlombok:lombok'
    testImplementation 'org.springframework.boot:spring-boot-starter-test'
}
Authorization Server Config 생성
Oauth2AuthorizationConfig를 생성하고 아래 어노테이션을 붙여서 인증 서버를 활성화 합니다.
@Configuration
@EnableAuthorizationServer
클라이언트 정보는 테스트를 위해 일단 더미 데이터를 세팅하겠습니다.
redirectUri
인증 완료 후 이동할 클라이언트 웹 페이지 주소로 code 값을 실어서 보내줍니다.
authorizedGrantTypes
인증 방식은 총 4가지가 있습니다. 그중 authorization_code 방식이 주로 사용됩니다.
| Authorization Code | 가장 대중적인 방식. Service Provider가 제공하는 인증 화면에 로그인하고 클라이언트 앱이 요청하는 리소스 접근 요청을 승인하면, 지정한 redirect_uri로 code를 넘겨주는데. 해당 code로 access_token을 얻는다. |
| Implicit | Authorization Code와 flow가 비슷하다. 인증 후 redirect_uri로 직접 access_token을 전달받으므로. 전체 프로세스는 좀 더 간단해지지만 Authorization Code 방식에 비해 보안성은 떨어진다. |
| password credential | Resource Owner가 직접 Client에 아이디와 패스워드를 입력하고 Authorization 서버에 해당 정보로 인증받아 access_token을 직접 얻어오는 방식. access token을 얻어올 때 Client에 아이디 패스워드가 노출되어 보안이 떨어지므로 일반적으로 공식 애플리케이션에서만 사용한다. |
| client credential | access_token을 얻는데 정해진 인증 key(secret)로 요청하며, 일반적인 사용보다는 server 간 통신을 할 때 사용한다. |
scopes
인증 후 얻은 accessToken으로 접근할 수 있는 리소스의 범위입니다. 테스트로 read, write scope가 있다고 세팅 합니다. resource서버(api서버)에서는 해당 scope정보로 클라이언트에게 제공할 리소스를 제한하거나 노출시킵니다.
accessTokenValiditySeconds
발급된 accessToken의 유효시간(초) 입니다.
@Configuration
@EnableAuthorizationServer
public class Oauth2AuthorizationConfig extends AuthorizationServerConfigurerAdapter {

    public void configure(ClientDetailsServiceConfigurer clients) throws Exception {
        clients.inMemory()
                .withClient("testClientId")
                .secret("testSecret")
                .redirectUris("http://localhost:8081/oauth2/callback")
                .authorizedGrantTypes("authorization_code")
                .scopes("read", "write")
                .accessTokenValiditySeconds(30000);
    }
}
SpringSecurity Config 생성
config 패키지 하위에 SpringSecurityConfig를 작성합니다.
password세팅 시에는 암호화에 대한 준비가 아직 되어있지 않으므로 NoOpPasswordEncoder를 사용하도록 세팅합니다. 인증할 회원 정보도 테스트를 위해 일단 더미로 세팅합니다. csrf는 사용 안 함 처리합니다.
.headers().frameOptions().disable()은 security 적용 시 h2 console 사용이 막히므로 세팅합니다. oauth로 시작하는 리소스는 authorization 서버 세팅시 자동으로 생성되는 주소를 누구나 접근할 수 있게 하기 위한 세팅입니다. callback테스트를 위한 url과 h2 console용 주소도 모두 접근 가능하도록 세팅합니다. security 로그인 화면은 일단 기본 폼을 사용하도록 세팅합니다.
@Configuration
@EnableWebSecurity
public class SecurityConfig extends WebSecurityConfigurerAdapter {
    @Bean
    public PasswordEncoder noOpPasswordEncoder() {
      return NoOpPasswordEncoder.getInstance();
    }

    @Override
    protected void configure(AuthenticationManagerBuilder auth) throws Exception {
        auth.inMemoryAuthentication()
                .withUser("user")
                .password("pass")
                .roles("USER");
    }

    @Override
    protected void configure(HttpSecurity security) throws Exception {
        security
                .csrf().disable()
                .headers().frameOptions().disable()
                .and()
                .authorizeRequests().antMatchers("/oauth/**", "/oauth2/callback", "/h2-console/*").permitAll()
                .and()
                .formLogin().and()
                .httpBasic();
    }
}
공통 환경 세팅을 위한 WebMvcConfig 생성
config 패키지 하위에 WebMvcConfig를 생성하고 프로젝트에서 사용하는 공통 빈이나 필요한 환경 정보를 세팅합니다. 아래에서는 인증서버에 크로스 도메인 접근 가능하도록 cors 설정을 추가하였습니다. 그 외 Restemplate이나 PasswordEncoder 등 프로젝트 전반적으로 사용되는 모듈에 대한 Bean 설정을 추가합니다.
package com.rest.oauth2.config;

// import 생략

@Configuration
public class WebMvcConfig implements WebMvcConfigurer {

    private static final long MAX_AGE_SECONDS = 3600;

    @Override
    public void addCorsMappings(CorsRegistry registry) {
        registry.addMapping("/**")
                .allowedOrigins("*")
                .allowedMethods("GET", "POST", "PUT", "DELETE")
                .allowedHeaders("*")
                .allowCredentials(true)
                .maxAge(MAX_AGE_SECONDS);
    }

    @Bean
    public RestTemplate getRestTemplate() {
        return new RestTemplate();
    }

    @Bean
    public PasswordEncoder passwordEncoder() {
        return PasswordEncoderFactories.createDelegatingPasswordEncoder();
    }
}
application.yml 작성
향후 개발할 리소스 서버(api서버)와 구분을 두기 위해 8081로 세팅합니다.
나머지는 h2와 jpa설정입니다. 테스트 환경이나 기호에 맞게 변경해 사용하면 됩니다.
server:
  port: 8081
spring:
  h2:
    console:
      enabled: true
      settings:
        web-allow-others: true
  datasource:
    url: jdbc:h2:tcp://localhost/~/test
    driver-class-name: org.h2.Driver
    username: sa
  jpa:
    database-platform: org.hibernate.dialect.H2Dialect
    properties.hibernate.hbm2ddl.auto: update
    showSql: true
1차 테스트
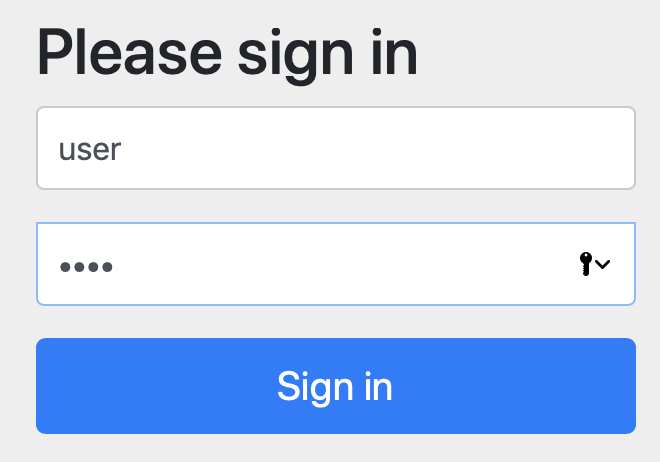
위에서 세팅한 테스트 클라이언트, 테스트 회원으로 다음과 같이 인증 url을 브라우저에서 호출합니다. authorization_code 인증 방식은 로그인이 완료되었을 때 인증 코드를 주는 방식 이므로 로그인이 되어있지 않은 경우 로그인 화면으로 리다이렉트 됩니다.(SpringSecurity에서 기본으로 제공하는 화면이며 커스텀하게 UI 변경 가능합니다.)
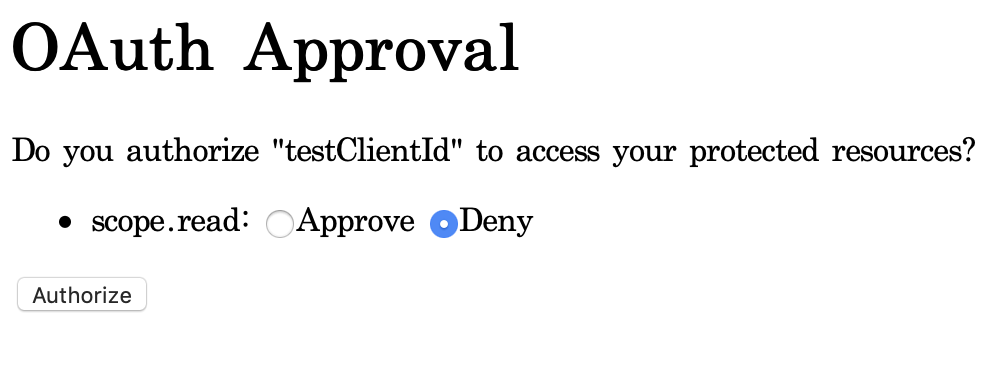
로그인에 성공하면 클라이언트의 리소스 허용 확인을 묻는 화면으로 이동합니다.
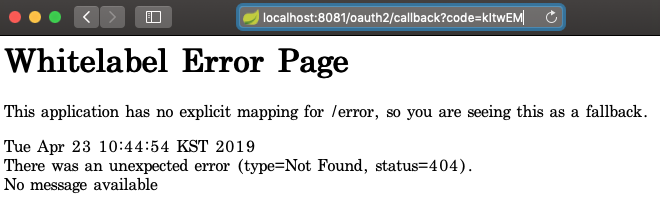
리소스 사용을 허용하면 테스트로 세팅한 redirectUri로 리다이렉트 됩니다. 현재는 받아줄 controller를 세팅하지 않았으므로 404 화면이 뜨게 됩니다. 여기서 봐야 될 중요한 점은 주소 마지막에 추가로 넘어온 code값입니다. code=KltwEm
authrization_code를 통한 승인 방식은 완료 후에 리다이렉트 주소로 code를 실어 보내주는데 해당 code값으로 api를 호출하여 accessToken을 얻을 수 있습니다.
토큰 정보를 받을 수 있도록 개선
build.gradle에 gson 라이브러리 추가
Json String을 Java 객체로 맵핑하기 위해 Gson 라이브러리를 추가합니다.
implementation 'com.google.code.gson:gson'
토큰정보를 받을 모델 생성
package com.rest.oauth2.model.oauth2;

import lombok.Getter;
import lombok.Setter;

@Getter
@Setter
public class OAuthToken {
    private String access_token;
    private String token_type;
    private String refresh_token;
    private long expires_in;
    private String scope;
}
토큰 생성을 확인하기 위한 redirect 주소 처리Controller 생성
controller.common package 아래에 Oauth2Controller 생성합니다. 이 Controller는 Oauth인증 완료 후 redirectUri를 처리해주기 위한 Controller로 원래는 해당 프로젝트가 아닌 클라이언트에 세팅되는 화면이 되어야 합니다. 하지만 인증서버 테스트 결과를 보기 위해서 임시로 만든 것입니다. curl 방식으로 다음과 같이 호출하여 결과를 볼 수도 있습니다.
기본적으로 토큰 요청 시 Header에 Authorization:Basic으로 clientId와 secret값을 인코딩해서 넣어야 하므로 생각보다 복잡합니다.
$ curl -X POST \
'http://localhost:8081/oauth/token' \
-H 'Authorization:Basic dGVzdENsaWVudElkOnRlc3RTZWNyZXQ=' \
-d 'grant_type=authorization_code' \
-d 'code=u6q9Ju' \
-d 'redirect_uri=http://localhost:8081/oauth2/callback'
@RequiredArgsConstructor
@RestController
@RequestMapping("/oauth2")
public class Oauth2Controller {

    private final Gson gson;
    private final RestTemplate restTemplate;

    @GetMapping(value = "/callback")
    public OAuthToken callbackSocial(@RequestParam String code) {

        String credentials = "testClientId:testSecret";
        String encodedCredentials = new String(Base64.encodeBase64(credentials.getBytes()));

        HttpHeaders headers = new HttpHeaders();
        headers.setContentType(MediaType.APPLICATION_FORM_URLENCODED);
        headers.add("Authorization", "Basic " + encodedCredentials);

        MultiValueMap<String, String> params = new LinkedMultiValueMap<>();
        params.add("code", code);
        params.add("grant_type", "authorization_code");
        params.add("redirect_uri", "http://localhost:8081/oauth2/callback");
        HttpEntity<MultiValueMap<String, String>> request = new HttpEntity<>(params, headers);
        ResponseEntity<String> response = restTemplate.postForEntity("http://localhost:8081/oauth/token", request, String.class);
        if (response.getStatusCode() == HttpStatus.OK) {
            return gson.fromJson(response.getBody(), OAuthToken.class);
        }
        return null;
    }
}
2차 테스트
1차와 동일한 url을 호출하여 인증 완료되면 이번에는 404 화면이 뜨지 않고 다음과 같은 결과를 볼 수 있습니다.
{
    "access_token":"5bf1b64e-d0fa-4f47-b747-aee27cf1dc0a",
    "token_type":"bearer",
    "refresh_token":null,
    "expires_in":29974,
    "scope":"read"
}
여기까지 간단하게 인증서버를 구축하여 Access Token을 얻는 것까지 실습을 진행해 보았습니다. 리소스 서버에 요청시 Access Token을 실어 보내면 해당 리소스 정보를 조회하거나 수정할 수 있습니다.

 사용해보기")

에 대하여")
