- Redis – install
- Redis – cluster
- Redis – SpringBoot2 redis cluster : strings, lists, hashs, sets, sortedsets, geo, hyperloglog
- Redis – Spring-data-redis : @Cacheable, @CachePut, @CacheEvict, @RedisHash
- Redis – spring-data-redis : 발행/구독(pub/sub) 모델의 구현
- Redis – Reactive redis
- Python으로 Redis cache 일괄 삭제 프로그램 만들기
이번장에서는 spring-data-redis를 이용하여 SpringBoot와 redis를 연동하고, Boot에서 제공하는 Cache 어노테이션을 사용하여 캐시를 처리하는 방법에 대해 실습하겠습니다.
builld.gradle
dependencies {
    implementation 'org.springframework.boot:spring-boot-starter-data-jpa'
    implementation 'org.springframework.boot:spring-boot-starter-freemarker'
    implementation 'org.springframework.boot:spring-boot-starter-web'
    implementation 'org.springframework.boot:spring-boot-starter-data-redis'
    implementation 'com.google.code.gson:gson'
    implementation 'com.h2database:h2'
    compileOnly 'org.projectlombok:lombok'
    annotationProcessor 'org.projectlombok:lombok'
    testImplementation 'org.springframework.boot:spring-boot-starter-test'
    testCompileOnly 'org.projectlombok:lombok'
}
application.yml
server:
  port: 8081

logging:
  level:
    root: warn
    com.rest.api: debug

spring:
  datasource:
    url: jdbc:h2:tcp://localhost/~/test
    driver-class-name: org.h2.Driver
    username: sa
  jpa:
    database-platform: org.hibernate.dialect.H2Dialect
    properties.hibernate:
      hbm2ddl.auto: update
      format_sql: true
    showSql: true
    generate-ddl: true
  redis:
    cluster:
      nodes:
        - 15.164.98.87:6300
        - 15.164.98.87:6301
        - 15.164.98.87:6302
        - 15.164.98.87:6400
        - 15.164.98.87:6401
        - 15.164.98.87:6402
      max-redirects: 3
    password: XXXXXXXXXXXXXXXX #Redis 암호. Redis설치시 설정안했으면 삭제하세요.
CacheKey.java 추가
캐시키와 유효시간 정보를 저장할 Class를 추가합니다.
package com.redis.cluster.common;

public class CacheKey {
    private CacheKey() {
    }
    public static final int DEFAULT_EXPIRE_SEC = 60;
    public static final String USER = "user";
    public static final int USER_EXPIRE_SEC = 180;
}
RedisCacheConfig 추가
@EnableCaching으로 Cache 사용을 활성화 합니다. cacheManager의 configuration을 통해 캐시 정책을 변경 합니다. 기본으로 사용하면 키의 expireTime을 세팅할수 없으므로 아래처럼 개별적으로 캐시에 대한 TTL(time to live)값을 세팅하도록 내용을 추가합니다. 기본 expireTime은 60초이며 User의 경우는 180초로 세팅하도록 설정하였습니다.
package com.redis.cluster.config;

import 생략...

import java.time.Duration;
import java.util.HashMap;
import java.util.Map;

@Configuration
@EnableCaching
public class RedisCacheConfig {

    @Bean(name = "cacheManager")
    public RedisCacheManager cacheManager(RedisConnectionFactory connectionFactory) {

        RedisCacheConfiguration configuration = RedisCacheConfiguration.defaultCacheConfig()
                .disableCachingNullValues()
                .entryTtl(Duration.ofSeconds(CacheKey.DEFAULT_EXPIRE_SEC))
                .computePrefixWith(CacheKeyPrefix.simple())
                .serializeKeysWith(RedisSerializationContext.SerializationPair.fromSerializer(new StringRedisSerializer()));

        Map<String, RedisCacheConfiguration> cacheConfigurations = new HashMap<>();
        // User
        cacheConfigurations.put(CacheKey.USER, RedisCacheConfiguration.defaultCacheConfig()
                .entryTtl(Duration.ofSeconds(CacheKey.USER_EXPIRE_SEC)));

        return RedisCacheManager.RedisCacheManagerBuilder.fromConnectionFactory(connectionFactory).cacheDefaults(configuration)
                .withInitialCacheConfigurations(cacheConfigurations).build();
    }
}
@Cacheable
Redis에 캐싱된 데이터가 있으면 반환하고, 없으면 DB에서 조회한다음 Redis에 캐시합니다. 어노테이션은 Method나 Type에 세팅할 수 있고 런타임에 수행됩니다.
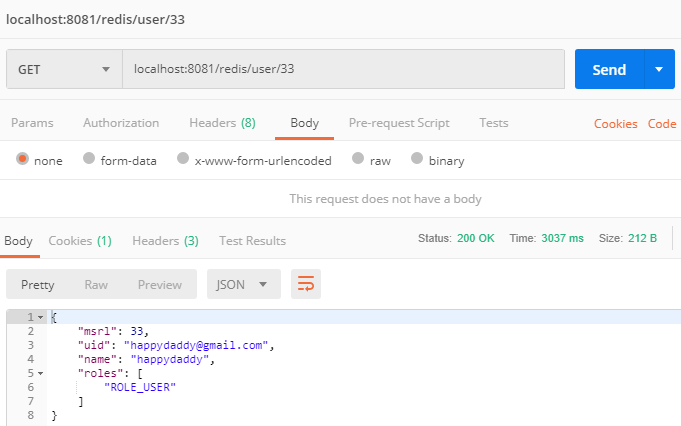
아래 내용은 고정된 key값 CacheKey.User와 유동적으로 변하는 값 msrl을 가지고 키를 조합하여 캐시를 조회합니다. 캐시이름은 “user::500” , “user::600″와 같이 “::”로 구분된 이름으로 저장됩니다. result가 null이 아닌 경우만 처리를 하며, 위의 설정에서 세팅한 expireTime=180초로 TTL이 설정 됩니다.
@Cacheable(value = CacheKey.USER, key = "#msrl", unless = "#result == null")
@GetMapping("/user/{msrl}")
public User findOne(@PathVariable long msrl) {
    return userJpaRepo.findById(msrl).orElse(null);
}
위 내용을 최초 호출하면 다음과 같이 로그에서 쿼리 수행 내역을 확인할 수 있습니다. 2번째 호출부터는 캐시된 데이터가 있으므로 쿼리가 수행되지 않는것을 확인 할수 있습니다.

Hibernate:
    select
        user0_.msrl as msrl1_0_0_,
        user0_.name as name2_0_0_,
        user0_.password as password3_0_0_,
        user0_.uid as uid4_0_0_,
        roles1_.user_msrl as user_msr1_1_1_,
        roles1_.roles as roles2_1_1_
    from
        user user0_
    left outer join
        user_roles roles1_
            on user0_.msrl=roles1_.user_msrl
    where
        user0_.msrl=?
redis console에서는 다음과 같이 확인 가능합니다.
6300 port에서 조회하였으나 다른 node에 key가 있는경우 자동으로 리다이렉트 됩니다.
예상한 대로 캐시이름은 “고정된키값::유동적인값” 으로 구성되는 것을 볼 수 있습니다.
type을 조회하면 string data structure 형식으로 캐시가 되는것을 확인 할 수 있습니다.
ttl명령을 통해 해당 키의 남은 유효시간을 확인 할 수 있습니다.
get으로 값을 조회해 보면 데이터는 plain이 아닌 serialize된 값으로 저장됨을 알수 있습니다.
$ redis-cli -c -p 6300
127.0.0.1:6300> exists user::33
 -> Redirected to slot [12701] located at 15.164.98.87:6302
 (integer) 1
127.0.0.1:6302> type user::33
 string
127.0.0.1:6300> ttl user::33
-> Redirected to slot [12701] located at 15.164.98.87:6302
(integer) 49
127.0.0.1:6302> get user::33
"\xac\xed\x00\x05sr\x00\x1dcom.redis.cluster.entity.UserG\x81\x95K\xed\xab@P\x02\x00\x05J\x00\x04msrlL\x00\x04namet\x00\x12Ljava/lang/String;L\x00\bpasswordq\x00~\x00\x01L\x00\x05rolest\x00\x10Ljava/util/List;L\x00\x03uidq\x00~\x00\x01xp\x00\x00\x00\x00\x00\x00\x00!t\x00\nhappydaddyt\x00D{bcrypt}$2a$10$HxDW9O1JTyuk3lorNTJg/.cz.pHjWj.jS6Pmw3u8p89gNChxhpLYmsr\x00/org.hibernate.collection.internal.PersistentBag>j\r0I_ \x8f\x02\x00\x01L\x00\x03bagq\x00~\x00\x02xr\x00>org.hibernate.collection.internal.AbstractPersistentCollectionW\x18\xb7]\x8a\xbasT\x02\x00\x0bZ\x00\x1ballowLoadOutsideTransactionI\x00\ncachedSizeZ\x00\x05dirtyZ\x00\x0eelementRemovedZ\x00\x0binitializedZ\x00\risTempSessionL\x00\x03keyt\x00\x16Ljava/io/Serializable;L\x00\x05ownert\x00\x12Ljava/lang/Object;L\x00\x04roleq\x00~\x00\x01L\x00\x12sessionFactoryUuidq\x00~\x00\x01L\x00\x0estoredSnapshotq\x00~\x00\bxp\x00\xff\xff\xff\xff\x00\x00\x01\x00sr\x00\x0ejava.lang.Long;\x8b\xe4\x90\xcc\x8f#\xdf\x02\x00\x01J\x00\x05valuexr\x00\x10java.lang.Number\x86\xac\x95\x1d\x0b\x94\xe0\x8b\x02\x00\x00xp\x00\x00\x00\x00\x00\x00\x00!q\x00~\x00\x03t\x00#com.redis.cluster.entity.User.rolespsr\x00\x13java.util.ArrayListx\x81\xd2\x1d\x99\xc7a\x9d\x03\x00\x01I\x00\x04sizexp\x00\x00\x00\x01w\x04\x00\x00\x00\x01t\x00\tROLE_USERxsq\x00~\x00\x0f\x00\x00\x00\x01w\x04\x00\x00\x00\x01q\x00~\x00\x11xt\x00\x14happydaddy@gmail.com"
@CachePut
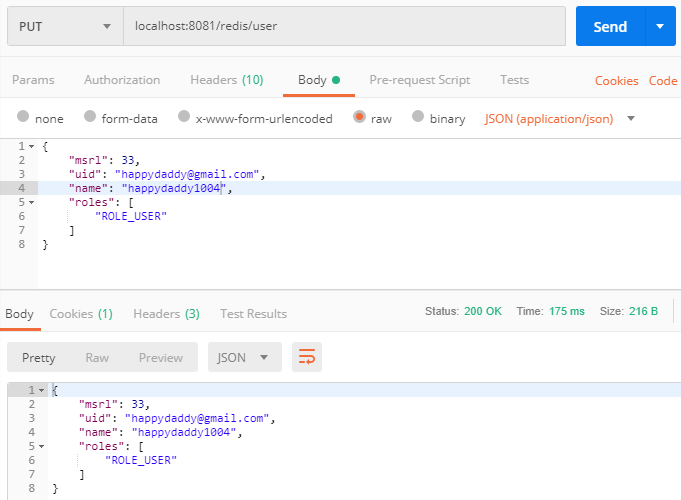
Redis에 저장된 캐시정보를 갱신합니다. 저장된 캐시가 없을경우엔 캐시를 생성합니다. 어노테이션은 Method나 Type에 세팅할 수 있고 런타임에 수행됩니다. 아래 내용은 파라미터로 넘어온 User객체로 DB를 업데이트하고 msrl값과 고정키값으로 조합된 캐시키로 캐시를 찾아내 갱신합니다. User객체를 다음과 같이 생성하여 Put요청을 보내면 user::33 이름으로 저장된 캐시 데이터가 갱신됩니다.
{
    "msrl": 33,
    "uid": "happydaddy@gmail.com",
    "name": "happydaddy1004",
    "roles": [
        "ROLE_USER"
    ]
}
@CachePut(value = CacheKey.USER, key = "#user.msrl")
@PutMapping("/user")
@ResponseBody
public User putUser(@RequestBody User user) {
    return userJpaRepo.save(user);
}

Hibernate:
    select
        user0_.msrl as msrl1_0_0_,
        user0_.name as name2_0_0_,
        user0_.password as password3_0_0_,
        user0_.uid as uid4_0_0_
    from
        user user0_
    where
        user0_.msrl=?
Hibernate:
    select
        roles0_.user_msrl as user_msr1_1_0_,
        roles0_.roles as roles2_1_0_
    from
        user_roles roles0_
    where
        roles0_.user_msrl=?
Hibernate:
    update
        user
    set
        name=?,
        password=?,
        uid=?
    where
        msrl=?
Hibernate:
    delete
    from
        user_roles
    where
        user_msrl=?
Hibernate:
    insert
    into
        user_roles
        (user_msrl, roles)
    values
        (?, ?)
CacheEvict
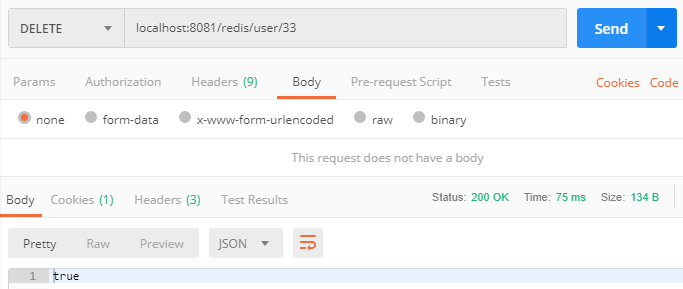
Redis에 저장된 캐시 정보를 삭제 합니다. 아래 내용은 DB데이터 삭제후에 고정된 키값과 파라미터의 msrl로 캐시키를 조합하여 해당 캐시를 삭제합니다.
@CacheEvict(value = CacheKey.USER, key = "#msrl")
@DeleteMapping("/user/{msrl}")
@ResponseBody
public boolean deleteUser(@PathVariable long msrl) {
    userJpaRepo.deleteById(msrl);
    return true;
}

Hibernate:
    select
        user0_.msrl as msrl1_0_0_,
        user0_.name as name2_0_0_,
        user0_.password as password3_0_0_,
        user0_.uid as uid4_0_0_,
        roles1_.user_msrl as user_msr1_1_1_,
        roles1_.roles as roles2_1_1_
    from
        user user0_
    left outer join
        user_roles roles1_
            on user0_.msrl=roles1_.user_msrl
    where
        user0_.msrl=?
Hibernate:
    delete
    from
        user_roles
    where
        user_msrl=?
Hibernate:
    delete
    from
        user
    where
        msrl=?
Redis Console에서 확인하면 캐시가 삭제되어 존재하지 않음을 확인할 수 있습니다.
$ redis-cli -c -p 6300
127.0.0.1:6300> exists user:33
-> Redirected to slot [14270] located at 15.164.98.87:6302
(integer) 0
RedisHash
redis를 jpa repository 사용하듯이 쓸수 있게 해주는 어노테이션입니다. 설정도 jpa와 별반 다르지 않습니다. 아래 내용을 작성하여 결과를 확인해 봅시다.
redis용 entity를 생성합니다. jpa의 @entity대신 @redishash(키값)으로 생성합니다.
package com.redis.cluster.entity.redis;

import lombok.Builder;
import lombok.Getter;
import org.springframework.data.annotation.Id;
import org.springframework.data.redis.core.RedisHash;

@Getter
@Builder
@RedisHash("student")
public class Student {
    @Id
    private long studentId;
    private String name;

    public void update(String name) {
        this.name = name;
    }
}
redis용 repository를 생성합니다. jpa의 JpaRepository대신 CrudRepository를 extend 합니다.
package com.redis.cluster.repo.redis;

import com.redis.cluster.entity.redis.Student;
import org.springframework.data.repository.CrudRepository;

public interface StudentRedisRepo extends CrudRepository<Student, Long> {
}
jpa repositoy와 동일한 메서드를 사용가능합니다. 해당 메서드로 테스트 코드를 작성하고 결과를 확인하면 정상적으로 작동되는것을 확인할 수 있습니다.
@Test
public void redisHash_Insert() {
    long studentId = 1L;
    String name = "행복하라";
    Student student = Student.builder().studentId(studentId).name(name).build();
    redisRepo.save(student);

    Student cachedStudent = redisRepo.findById(studentId).orElse(null);
    assertNotNull(cachedStudent);
    assertEquals(1L, cachedStudent.getStudentId());
    assertEquals(name, cachedStudent.getName());
}

@Test
public void redisHash_Update() {
    long studentId = 1L;
    String name = "행복하라";
    Student student = Student.builder().studentId(studentId).name(name).build();
    student.update("정직하라");
    redisRepo.save(student);

    Student cachedStudent = redisRepo.findById(studentId).orElse(null);
    assertNotNull(cachedStudent);
    assertEquals(1L, cachedStudent.getStudentId());
    assertEquals("정직하라", cachedStudent.getName());
}
redis console에서 데이터를 확인해봅니다. 캐시는 키값::@Id로 생성됩니다. 확인해보면 type은 hash로 저장됩니다. 그리고 hash 내부에 저장된 key값을 보면 첫번째는 저장된 클래스의 정보, 그 다음부터는 각각의 필드로 key가 저장됨을 확인할수 있습니다. hget을 통해 해당 key값에 저장된 데이터를 볼수 있습니다.
127.0.0.1:6300> exists "student:1"
(integer) 1
127.0.0.1:6300> type "student:1"
hash
127.0.0.1:6300> hkeys "student:1"
1) "_class"
2) "studentId"
3) "name"
127.0.0.1:6300> hget "student:1" "_class"
"com.redis.cluster.entity.redis.Student"
127.0.0.1:6300> hget "student:1" "studentId"
"1"
127.0.0.1:6300> hget "student:1" "name"
"\xed\x96\x89\xeb\xb3\xb5\xed\x95\x98\xeb\x9d\xbc"
최신 소스는 GitHub 사이트를 참고해 주세요.
https://github.com/codej99/SpringRedisCluster/tree/feature/redisannotation


