- SpringBoot2로 Rest api 만들기(1) – Intellij Community 프로젝트생성
- SpringBoot2로 Rest api 만들기(2) – HelloWorld
- SpringBoot2로 Rest api 만들기(3) – H2 Database 연동
- SpringBoot2로 Rest api 만들기(4) – Swagger API 문서 자동화
- SpringBoot2로 Rest api 만들기(5) – API 인터페이스 및 결과 데이터 구조 설계
- SpringBoot2로 Rest api 만들기(6) – ControllerAdvice를 이용한 Exception처리
- SpringBoot2로 Rest api 만들기(7) – MessageSource를 이용한 Exception 처리
- SpringBoot2로 Rest api 만들기(8) – SpringSecurity 를 이용한 인증 및 권한부여
- SpringBoot2로 Rest api 만들기(9) – Spring Starter Unit Test
- SpringBoot2로 Rest api 만들기(10) – Social Login kakao
- SpringBoot2로 Rest api 만들기(11) – profile을 이용한 환경별 설정 분리
- SpringBoot2로 Rest api 만들기(12) – Deploy & Nginx 연동 & 무중단 배포 하기
- SpringBoot2로 Rest api 만들기(13) – Jenkins 배포(Deploy) + Git Tag Rollback
- SpringBoot2로 Rest api 만들기(14) – 간단한 JPA 게시판(board) 만들기
- SpringBoot2로 Rest api 만들기(15) – Redis로 api 결과 캐싱(Caching)처리
- SpringBoot2로 Rest api 만들기(16) – AOP와 Custom Annotation을 이용한 금칙어(Forbidden Word) 처리
이번 시간에는 SpringSecurity를 이용하여 api 서버의 사용 권한을 제한하는 방법에 대해 알아보도록 하겠습니다. 지금까지 개발한 api는 권한 부여 기능이 없어 누구나 회원 정보를 조회, 생성 및 수정, 삭제를 할 수 있었습니다. 이 상태로 api를 서비스에 내보낸다면 많은 문제가 발생할 것은 불을 보듯 뻔한 일입니다. 이러한 문제를 해결하기 위해 인증한 회원만 api를 사용할 수 있도록 개선해 보겠습니다.
SpringSecurity
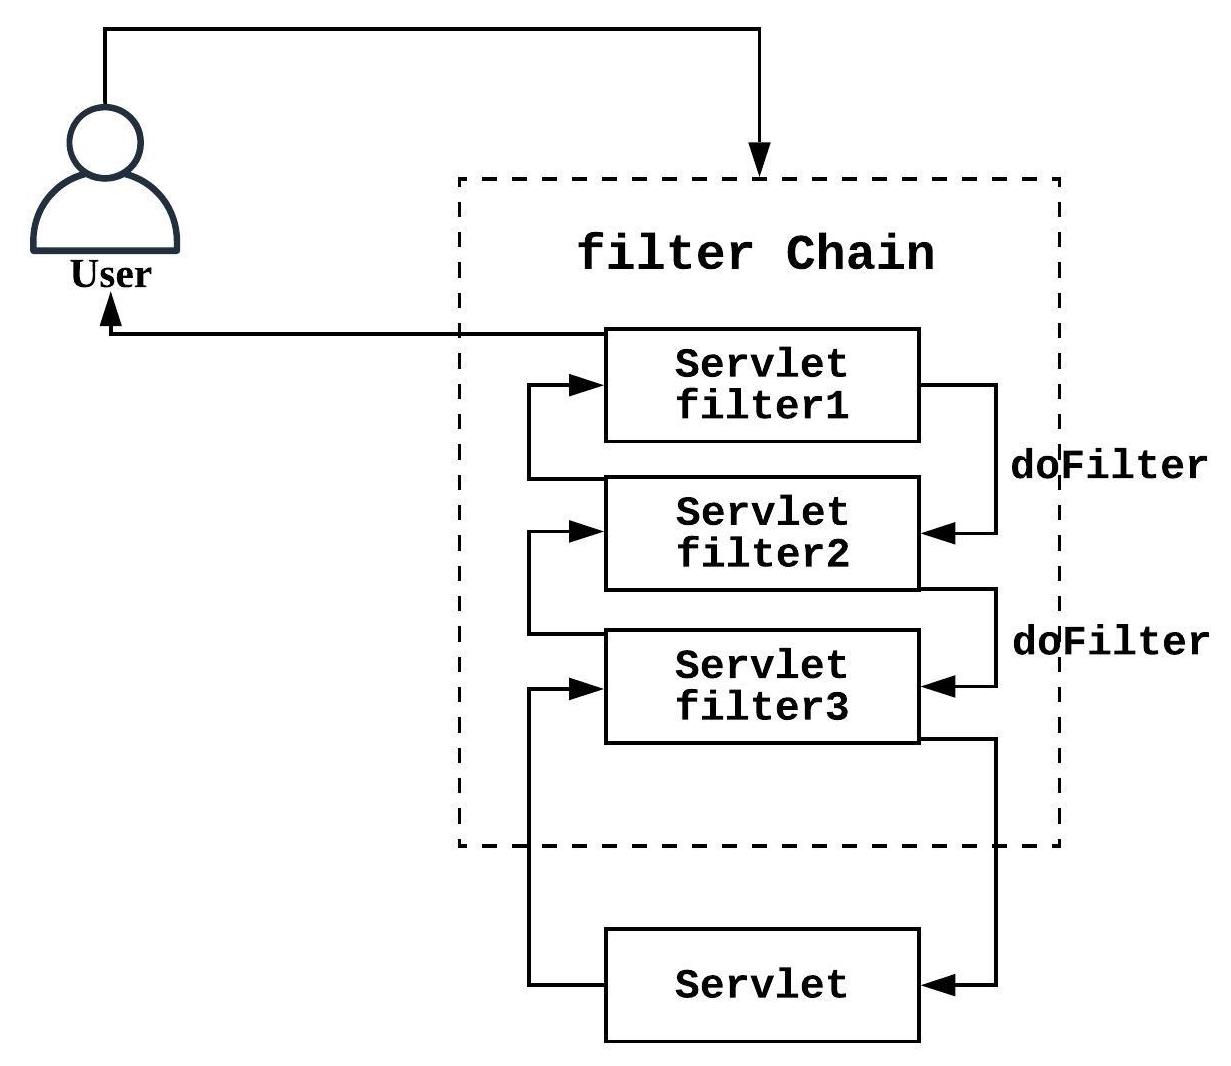
스프링에서는 인증 및 권한 부여를 통해 리소스의 사용을 쉽게 컨트롤할 수 있는 SpringSecurity framework를 제공하고 있습니다. Spring boot기반의 프로젝트에 SpringSecurity를 적용하면 보안 관련 처리를 자체적으로 구현할 필요 없이 쉽게 필요한 기능을 구현할 수 있습니다. 간략하게 아래의 그림처럼 SpringSecurity는 Spring의 DispatcherServlet 앞단에 Filter를 등록시켜 요청을 가로챕니다. 클라이언트에게 리소스 접근 권한이 없을 경우엔 인증(ex:로그인) 화면으로 자동으로 리다이렉트 합니다.

SpringSecurity Filter
SpringSecurity는 기능별 필터의 집합으로 되어있고 필터의 처리 순서는 아래와 같습니다. 종류가 매우 많지만 여기서 중요한 것은 필터의 처리 순서입니다. 클라이언트가 리소스를 요청할 때 접근 권한이 없는 경우 기본적으로 로그인 폼으로 보내게 되는데 그 역할을 하는 필터는 UsernamePasswordAuthenticationFilter입니다.
Rest Api에서는 로그인 폼이 따로 없으므로 인증 권한이 없다는 오류 Json을 내려줘야 하므로
UsernamePasswordAuthenticationFilter 전에 관련 처리를 넣어야 함을 알 수 있습니다.
- ChannelProcessingFilter
- SecurityContextPersistenceFilter
- ConcurrentSessionFilter
- HeaderWriterFilter
- CsrfFilter
- LogoutFilter
- X509AuthenticationFilter
- AbstractPreAuthenticatedProcessingFilter
- CasAuthenticationFilter
- UsernamePasswordAuthenticationFilter
- BasicAuthenticationFilter
- SecurityContextHolderAwareRequestFilter
- JaasApiIntegrationFilter
- RememberMeAuthenticationFilter
- AnonymousAuthenticationFilter
- SessionManagementFilter
- ExceptionTranslationFilter
- FilterSecurityInterceptor
- SwitchUserFilter
API 인증 및 권한 부여, 제한된 리소스의 요청
- 인증을 위해 가입(Signup)및 로그인(Signin) api를 구현합니다.
- 가입 시 제한된 리소스에 접근할 수 있는 ROLE_USER 권한을 회원에게 부여합니다.
- SpringSecurity 설정에는 접근 제한이 필요한 리소스에 대해서 ROLE_USER 권한을 가져야 접근 가능하도록 세팅합니다.
- 권한을 가진 회원이 로그인 성공 시엔 리소스에 접근할 수 있는 Jwt 보안 토큰을 발급합니다.
- Jwt 보안 토큰으로 회원은 권한이 필요한 api 리소스를 요청하여 사용합니다.
JWT 란?
JSON Web Token (JWT)은 JSON 객체로서 당사자간에 안전하게 정보를 전송할 수 있는 작고 독립적인 방법을 정의하는 공개 표준 (RFC 7519)입니다. 자세한 내용은 아래 링크에서 확인할 수 있습니다.
https://jwt.io/introduction/
Jwt는 JSON 객체를 암호화하여 만든 String값으로 기본적으로 암호화되어있어 변조하기가 어려운 정보입니다. 또한 다른 토큰과 달리 토큰 자체에 데이터를 가지고 있습니다. api 서버에서는 로그인이 완료된 클라이언트에게 회원을 구분할 수 있는 값을 넣은 Jwt 토큰을 생성하여 발급하고, 클라이언트는 이 Jwt 토큰을 이용하여 권한이 필요한 리소스를 서버에 요청하는 데 사용할 수 있습니다. api서버는 클라이언트에게서 전달받은 Jwt 토큰이 유효한지 확인하고 담겨있는 회원 정보를 확인하여 제한된 리소스를 제공하는데 이용할 수 있습니다.
build.gradle에 library 추가
SpringSecurity 및 Jwt관련 라이브러리를 build.gradle에 추가합니다.
implementation 'org.springframework.boot:spring-boot-starter-security'
implementation 'io.jsonwebtoken:jjwt:0.9.1'
JwtTokenProvider 생성
Jwt 토큰 생성 및 유효성 검증을 하는 컴포넌트입니다. Jwt는 여러 가지 암호화 알고리즘을 제공하며 알고리즘(SignatureAlgorithm.XXXXX)과 비밀키(secretKey)를 가지고 토큰을 생성하게 됩니다. 이때 claim정보에는 토큰에 부가적으로 실어 보낼 정보를 세팅할 수 있습니다. claim 정보에 회원을 구분할 수 있는 값을 세팅하였다가 토큰이 들어오면 해당 값으로 회원을 구분하여 리소스를 제공하면 됩니다. 그리고 Jwt토큰에는 expire 시간을 세팅할 수 있습니다. 토큰 발급 후 일정 시간 이후에는 토큰을 만료시키는 데 사용할 수 있습니다. resolveToken 메서드는 Http request header에 세팅된 토큰 값을 가져와 유효성을 체크합니다. 제한된 리소스를 요청할 때 Http header에 토큰을 세팅하여 호출하면 유효성을 검증하여 사용자 인증을 할 수 있습니다.
package com.rest.api.config.security;

// import 생략

@RequiredArgsConstructor
@Component
public class JwtTokenProvider { // JWT 토큰을 생성 및 검증 모듈

    @Value("spring.jwt.secret")
    private String secretKey;

    private long tokenValidMilisecond = 1000L * 60 * 60; // 1시간만 토큰 유효

    private final UserDetailsService userDetailsService;

    @PostConstruct
    protected void init() {
        secretKey = Base64.getEncoder().encodeToString(secretKey.getBytes());
    }

    // Jwt 토큰 생성
    public String createToken(String userPk, List<String> roles) {
        Claims claims = Jwts.claims().setSubject(userPk);
        claims.put("roles", roles);
        Date now = new Date();
        return Jwts.builder()
                .setClaims(claims) // 데이터
                .setIssuedAt(now) // 토큰 발행일자
                .setExpiration(new Date(now.getTime() + tokenValidMilisecond)) // set Expire Time
                .signWith(SignatureAlgorithm.HS256, secretKey) // 암호화 알고리즘, secret값 세팅
                .compact();
    }

    // Jwt 토큰으로 인증 정보를 조회
    public Authentication getAuthentication(String token) {
        UserDetails userDetails = userDetailsService.loadUserByUsername(this.getUserPk(token));
        return new UsernamePasswordAuthenticationToken(userDetails, "", userDetails.getAuthorities());
    }

    // Jwt 토큰에서 회원 구별 정보 추출
    public String getUserPk(String token) {
        return Jwts.parser().setSigningKey(secretKey).parseClaimsJws(token).getBody().getSubject();
    }

    // Request의 Header에서 token 파싱 : "X-AUTH-TOKEN: jwt토큰"
    public String resolveToken(HttpServletRequest req) {
        return req.getHeader("X-AUTH-TOKEN");
    }

    // Jwt 토큰의 유효성 + 만료일자 확인
    public boolean validateToken(String jwtToken) {
        try {
            Jws<Claims> claims = Jwts.parser().setSigningKey(secretKey).parseClaimsJws(jwtToken);
            return !claims.getBody().getExpiration().before(new Date());
        } catch (Exception e) {
            return false;
        }
    }
}
spring:
  datasource:
    url: jdbc:h2:tcp://localhost/~/test
    driver-class-name: org.h2.Driver
    username: sa
  jpa:
    database-platform: org.hibernate.dialect.H2Dialect
    properties.hibernate.hbm2ddl.auto: update
    showSql: true
  messages:
    basename: i18n/exception
    encoding: UTF-8
  jwt:
    secret: govlepel@$&
JwtAuthenticationFilter 생성
Jwt가 유효한 토큰인지 인증하기 위한 Filter입니다. com.rest.api.config.security 하위에 Class를 생성합니다. 이 필터는 Security 설정 시 UsernamePasswordAuthenticationFilter앞에 세팅할 것입니다.
package com.rest.api.config.security;

// import 생략

public class JwtAuthenticationFilter extends GenericFilterBean {

    private JwtTokenProvider jwtTokenProvider;

    // Jwt Provier 주입
    public JwtAuthenticationFilter(JwtTokenProvider jwtTokenProvider) {
        this.jwtTokenProvider = jwtTokenProvider;
    }

    // Request로 들어오는 Jwt Token의 유효성을 검증(jwtTokenProvider.validateToken)하는 filter를 filterChain에 등록합니다.
    @Override
    public void doFilter(ServletRequest request, ServletResponse response, FilterChain filterChain) throws IOException, ServletException {
        String token = jwtTokenProvider.resolveToken((HttpServletRequest) request);
        if (token != null && jwtTokenProvider.validateToken(token)) {
            Authentication auth = jwtTokenProvider.getAuthentication(token);
            SecurityContextHolder.getContext().setAuthentication(auth);
        }
        filterChain.doFilter(request, response);
    }
}
SpringSecurity Configuration
서버에 보안 설정을 적용합니다. com.rest.api.config.security 하위에 다음 Class를 작성합니다. 아무나 접근 가능한 리소스는 permitAll()로 세팅하고 나머지 리소스는 다음과 같이 ‘ROLE_USER’ 권한이 필요함으로 명시합니다. anyRequest().hasRole(“USER”) 또는 anyRequest().authenticated()는 동일한 동작을 합니다.
위에서 설명했듯이 해당 filter는 UsernamePasswordAuthenticationFilter 앞에 설정해야 합니다. SpringSecurity 적용 후에는 모든 리소스에 대한 접근이 제한되므로. Swagger 페이지에 대해서는 예외를 적용해야 페이지에 접근할 수 있습니다. 리소스 접근 제한 표현식은 여러 가지가 있으며 다음과 같습니다.
hasIpAddress(ip) – 접근자의 IP주소가 매칭 하는지 확인합니다.
hasRole(role) – 역할이 부여된 권한(Granted Authority)과 일치하는지 확인합니다.
hasAnyRole(role) – 부여된 역할 중 일치하는 항목이 있는지 확인합니다.
ex) access = “hasAnyRole(‘ROLE_USER’,’ROLE_ADMIN’)”
permitAll – 모든 접근자를 항상 승인합니다.
denyAll – 모든 사용자의 접근을 거부합니다.
anonymous – 사용자가 익명 사용자인지 확인합니다.
authenticated – 인증된 사용자인지 확인합니다.
rememberMe – 사용자가 remember me를 사용해 인증했는지 확인합니다.
fullyAuthenticated – 사용자가 모든 크리덴셜을 갖춘 상태에서 인증했는지 확인합니다.
package com.rest.api.config.security;

// import 생략

@RequiredArgsConstructor
@Configuration
public class SecurityConfiguration extends WebSecurityConfigurerAdapter {

    private final JwtTokenProvider jwtTokenProvider;

    @Bean
    @Override
    public AuthenticationManager authenticationManagerBean() throws Exception {
        return super.authenticationManagerBean();
    }

    @Override
    protected void configure(HttpSecurity http) throws Exception {
        http
            .httpBasic().disable() // rest api 이므로 기본설정 사용안함. 기본설정은 비인증시 로그인폼 화면으로 리다이렉트 된다.
            .csrf().disable() // rest api이므로 csrf 보안이 필요없으므로 disable처리.
            .sessionManagement().sessionCreationPolicy(SessionCreationPolicy.STATELESS) // jwt token으로 인증하므로 세션은 필요없으므로 생성안함.
            .and()
                .authorizeRequests() // 다음 리퀘스트에 대한 사용권한 체크
                    .antMatchers("/*/signin", "/*/signup").permitAll() // 가입 및 인증 주소는 누구나 접근가능
                    .antMatchers(HttpMethod.GET, "helloworld/**").permitAll() // hellowworld로 시작하는 GET요청 리소스는 누구나 접근가능
                    .anyRequest().hasRole("USER") // 그외 나머지 요청은 모두 인증된 회원만 접근 가능
            .and()
                .addFilterBefore(new JwtAuthenticationFilter(jwtTokenProvider), UsernamePasswordAuthenticationFilter.class); // jwt token 필터를 id/password 인증 필터 전에 넣는다

    }

    @Override // ignore check swagger resource
    public void configure(WebSecurity web) {
        web.ignoring().antMatchers("/v2/api-docs", "/swagger-resources/**",
                "/swagger-ui.html", "/webjars/**", "/swagger/**");

    }
}
Custom UserDetailsService 정의
토큰에 세팅된 유저 정보로 회원정보를 조회하는 UserDetailsService를 재정의 합니다.
@RequiredArgsConstructor
@Service
public class CustomUserDetailService implements UserDetailsService {

    private final UserJpaRepo userJpaRepo;

    public UserDetails loadUserByUsername(String userPk) {
        return userJpaRepo.findById(Long.valueOf(userPk)).orElseThrow(CUserNotFoundException::new);
    }
}
User Entity 수정
SpringSecurity의 보안을 적용하기 위해 User entity에 UserDetails Class를 상속받아 추가 정보를 재정의 합니다. roles는 회원이 가지고 있는 권한 정보이고, 가입했을 때는 기본 “ROLE_USER”가 세팅됩니다. 권한은 회원당 여러 개가 세팅될 수 있으므로 Collection으로 선언합니다.
getUsername은 security에서 사용하는 회원 구분 id입니다. 여기선 uid로 변경합니다.
다음 값들은 Security에서 사용하는 회원 상태 값입니다. 여기선 모두 사용 안 하므로 true로 설정합니다.
Json결과로 출력 안 할 데이터는 @JsonProperty(access = JsonProperty.Access.WRITE_ONLY) 어노테이션을 선언해줍니다.
isAccountNonExpired – 계정이 만료가 안되었는지
isAccountNonLocked – 계정이 잠기지 않았는지
isCredentialsNonExpired – 계정 패스워드가 만료 안됬는지
isEnabled – 계정이 사용 가능한지
@Builder // builder를 사용할수 있게 합니다.
@Entity // jpa entity임을 알립니다.
@Getter // user 필드값의 getter를 자동으로 생성합니다.
@NoArgsConstructor // 인자없는 생성자를 자동으로 생성합니다.
@AllArgsConstructor // 인자를 모두 갖춘 생성자를 자동으로 생성합니다.
@Table(name = "user") // 'user' 테이블과 매핑됨을 명시
public class User implements UserDetails {
    @Id // pk
    @GeneratedValue(strategy = GenerationType.IDENTITY)
    private long msrl;
    @Column(nullable = false, unique = true, length = 30)
    private String uid;
    @JsonProperty(access = JsonProperty.Access.WRITE_ONLY)
    @Column(nullable = false, length = 100)
    private String password;
    @Column(nullable = false, length = 100)
    private String name;

    @ElementCollection(fetch = FetchType.EAGER)
    @Builder.Default
    private List<String> roles = new ArrayList<>();

    @Override
    public Collection<? extends GrantedAuthority> getAuthorities() {
        return this.roles.stream().map(SimpleGrantedAuthority::new).collect(Collectors.toList());
    }

    @JsonProperty(access = JsonProperty.Access.WRITE_ONLY)
    @Override
    public String getUsername() {
        return this.uid;
    }

    @JsonProperty(access = JsonProperty.Access.WRITE_ONLY)
    @Override
    public boolean isAccountNonExpired() {
        return true;
    }

    @JsonProperty(access = JsonProperty.Access.WRITE_ONLY)
    @Override
    public boolean isAccountNonLocked() {
        return true;
    }

    @JsonProperty(access = JsonProperty.Access.WRITE_ONLY)
    @Override
    public boolean isCredentialsNonExpired() {
        return true;
    }

    @JsonProperty(access = JsonProperty.Access.WRITE_ONLY)
    @Override
    public boolean isEnabled() {
        return true;
    }
}
UserJpaRepo에 findByUid추가
회원 가입 시 가입한 이메일 조회를 위해 다음 메서드를 선언합니다.
public interface UserJpaRepo extends JpaRepository<User, Integer> {
    Optional<User> findByUid(String email);
}
로그인 예외 추가
CEmailSigninFailedException 생성
public class CEmailSigninFailedException extends RuntimeException {
    public CEmailSigninFailedException(String msg, Throwable t) {
        super(msg, t);
    }

    public CEmailSigninFailedException(String msg) {
        super(msg);
    }

    public CEmailSigninFailedException() {
        super();
    }
}
# exception_en.yml
emailSigninFailed:
  code: "-1001"
  msg: "Your account does not exist or your email or password is incorrect."

# exception_ko.yml
emailSigninFailed:
  code: "-1001"
  msg: "계정이 존재하지 않거나 이메일 또는 비밀번호가 정확하지 않습니다."
# ExceptionAdvice
@ExceptionHandler(CEmailSigninFailedException.class)
    @ResponseStatus(HttpStatus.INTERNAL_SERVER_ERROR)
    protected CommonResult emailSigninFailed(HttpServletRequest request, CEmailSigninFailedException e) {
        return responseService.getFailResult(Integer.valueOf(getMessage("emailSigninFailed.code")), getMessage("emailSigninFailed.msg"));
}
가입 / 로그인 Controller 추가
로그인 성공 시에는 결과로 Jwt토큰을 발급합니다.
가입 시에는 패스워드 인코딩을 위해 passwordEncoder설정을 합니다. 기본 설정은 bcrypt encoding이 사용됩니다.
@Api(tags = {"1. Sign"})
@RequiredArgsConstructor
@RestController
@RequestMapping(value = "/v1")
public class SignController {

    private final UserJpaRepo userJpaRepo;
    private final JwtTokenProvider jwtTokenProvider;
    private final ResponseService responseService;
    private final PasswordEncoder passwordEncoder;

    @ApiOperation(value = "로그인", notes = "이메일 회원 로그인을 한다.")
    @PostMapping(value = "/signin")
    public SingleResult<String> signin(@ApiParam(value = "회원ID : 이메일", required = true) @RequestParam String id,
                                       @ApiParam(value = "비밀번호", required = true) @RequestParam String password) {
        User user = userJpaRepo.findByUid(id).orElseThrow(CEmailSigninFailedException::new);
        if (!passwordEncoder.matches(password, user.getPassword()))
            throw new CEmailSigninFailedException();

        return responseService.getSingleResult(jwtTokenProvider.createToken(String.valueOf(user.getMsrl()), user.getRoles()));

 }

 @ApiOperation(value = "가입", notes = "회원가입을 한다.")
 @PostMapping(value = "/signup")
 public CommonResult signin(@ApiParam(value = "회원ID : 이메일", required = true) @RequestParam String id,
                               @ApiParam(value = "비밀번호", required = true) @RequestParam String password,
                               @ApiParam(value = "이름", required = true) @RequestParam String name) {

        userJpaRepo.save(User.builder()
                .uid(id)
                .password(passwordEncoder.encode(password))
                .name(name)
                .roles(Collections.singletonList("ROLE_USER"))
                .build());
        return responseService.getSuccessResult();
    }
}
SpringRestApiApplication에 passwordEncoder bean 추가
@SpringBootApplication
public class SpringRestApiApplication {
    public static void main(String[] args) {
        SpringApplication.run(SpringRestApiApplication.class, args);
    }

    @Bean
    public PasswordEncoder passwordEncoder() {
        return PasswordEncoderFactories.createDelegatingPasswordEncoder();
    }
}
UserController 수정
유효한 Jwt토큰을 설정해야만 User 리소스를 사용할 수 있도록 Header에 X-AUTH-TOKEN을 인자로 받도록 선언합니다.
@Api(tags = {"2. User"})
@RequiredArgsConstructor
@RestController
@RequestMapping(value = "/v1")
public class UserController {

    private final UserJpaRepo userJpaRepo;
    private final ResponseService responseService; // 결과를 처리할 Service

    @ApiImplicitParams({
            @ApiImplicitParam(name = "X-AUTH-TOKEN", value = "로그인 성공 후 access_token", required = true, dataType = "String", paramType = "header")
    })
    @ApiOperation(value = "회원 리스트 조회", notes = "모든 회원을 조회한다")
    @GetMapping(value = "/users")
    public ListResult<User> findAllUser() {
        // 결과데이터가 여러건인경우 getListResult를 이용해서 결과를 출력한다.
        return responseService.getListResult(userJpaRepo.findAll());
    }

    @ApiImplicitParams({
            @ApiImplicitParam(name = "X-AUTH-TOKEN", value = "로그인 성공 후 access_token", required = false, dataType = "String", paramType = "header")
    })
    @ApiOperation(value = "회원 단건 조회", notes = "회원번호(msrl)로 회원을 조회한다")
    @GetMapping(value = "/user")
    public SingleResult<User> findUserById(@ApiParam(value = "언어", defaultValue = "ko") @RequestParam String lang) {
        // SecurityContext에서 인증받은 회원의 정보를 얻어온다.
        Authentication authentication = SecurityContextHolder.getContext().getAuthentication();
        String id = authentication.getName();
        // 결과데이터가 단일건인경우 getSingleResult를 이용해서 결과를 출력한다.
        return responseService.getSingleResult(userJpaRepo.findByUid(id).orElseThrow(CUserNotFoundException::new));
    }

    @ApiImplicitParams({
            @ApiImplicitParam(name = "X-AUTH-TOKEN", value = "로그인 성공 후 access_token", required = true, dataType = "String", paramType = "header")
    })
    @ApiOperation(value = "회원 수정", notes = "회원정보를 수정한다")
    @PutMapping(value = "/user")
    public SingleResult<User> modify(
            @ApiParam(value = "회원번호", required = true) @RequestParam int msrl,
            @ApiParam(value = "회원이름", required = true) @RequestParam String name) {
        User user = User.builder()
                .msrl(msrl)
                .name(name)
                .build();
        return responseService.getSingleResult(userJpaRepo.save(user));
    }

    @ApiImplicitParams({
            @ApiImplicitParam(name = "X-AUTH-TOKEN", value = "로그인 성공 후 access_token", required = true, dataType = "String", paramType = "header")
    })
    @ApiOperation(value = "회원 삭제", notes = "userId로 회원정보를 삭제한다")
    @DeleteMapping(value = "/user/{msrl}")
    public CommonResult delete(
            @ApiParam(value = "회원번호", required = true) @PathVariable int msrl) {
        userJpaRepo.deleteById(msrl);
        // 성공 결과 정보만 필요한경우 getSuccessResult()를 이용하여 결과를 출력한다.
        return responseService.getSuccessResult();
    }
}
Test Swagger
회원가입 -> 로그인 -> 토큰을 이용한 회원정보 조회순으로 Test를 진행합니다.


인증 토큰을 발급받아 제한된 리소스에 접근하는 것에 대한 테스트가 완료되었습니다.
예외 처리 보완
다음과 같은 상황을 예측해 볼 수 있습니다.
- Jwt토큰 없이 api를 호출하였을 경우
- 형식에 맞지 않거나 만료된 Jwt토큰으로 api를 호출한 경우
- Jwt토큰으로 api를 호출하였으나 해당 리소스에 대한 권한이 없는 경우
1,2 번은 다음과 같은 오류가 발생합니다.

3번은 다음과 같은 오류가 발생합니다.

커스텀 예외 처리가 적용이 안되는 이유
위의 상황에서 커스텀으로 적용한 예외 처리가 적용이 안 되는 이유는 필터링의 순서 때문입니다. 지금까지 적용한 커스텀 예외처리는 ControllerAdvice 즉 Spring이 처리 가능한 영역까지 리퀘스트가 도달해야 처리할 수 있습니다. 그러나 SpringSecurity는 Spring 앞단에서 필터링을 하기 때문에, 해당 상황의 exeption이 Spring의 DispatcherServlet까지 도달하지 않게 됩니다.
1,2 번에 대한 해결책
온전한 Jwt가 전달이 안될 경우는 토큰 인증 처리 자체가 불가능하기 때문에, 토큰 검증 단에서 프로세스가 끝나버리게 됩니다. 해당 예외를 잡아내려면 SpringSecurity에서 제공하는 AuthenticationEntryPoint를 상속받아 재정의 해야 합니다. 예외가 발생할 경우 아래에서는 /exception/entrypoint로 포워딩되도록 처리하였습니다.
CustomAuthenticationEntryPoint 작성
package com.rest.api.config.security;

import lombok.extern.slf4j.Slf4j;
import org.springframework.security.core.AuthenticationException;
import org.springframework.security.web.AuthenticationEntryPoint;
import org.springframework.stereotype.Component;

import javax.servlet.RequestDispatcher;
import javax.servlet.ServletException;
import javax.servlet.http.HttpServletRequest;
import javax.servlet.http.HttpServletResponse;
import java.io.IOException;

@Slf4j
@Component
public class CustomAuthenticationEntryPoint implements AuthenticationEntryPoint {

    @Override
    public void commence(HttpServletRequest request, HttpServletResponse response, AuthenticationException ex) throws IOException,
            ServletException {
        response.sendRedirect("/exception/entrypoint");
    }
}
ExceptionController 작성
controller package하위에 exception package를 생성하고 ExceptionController를 작성합니다. 내용은 /exception/entrypoint로 주소가 들어오면 CAuthenticationEntryPointException을 발생시키라는 것입니다.
package com.rest.api.controller.exception;

// import 생략

@RequiredArgsConstructor
@RestController
@RequestMapping(value = "/exception")
public class ExceptionController {

    @GetMapping(value = "/entrypoint")
    public CommonResult entrypointException() {
        throw new CAuthenticationEntryPointException();
    }
}
CAuthenticationEntryPointException 생성
package com.rest.api.advice.exception;

public class CAuthenticationEntryPointException extends RuntimeException {
    public CAuthenticationEntryPointException(String msg, Throwable t) {
        super(msg, t);
    }

    public CAuthenticationEntryPointException(String msg) {
        super(msg);
    }

    public CAuthenticationEntryPointException() {
        super();
    }
}
Message 내용 추가
// exception_ko.yml
entryPointException:
   code: "-1002"
   msg: "해당 리소스에 접근하기 위한 권한이 없습니다."
// exception_en.yml
entryPointException:
   code: "-1002"
   msg: "You do not have permission to access this resource.
ExceptionAdvice 내용 추가
@ExceptionHandler(CAuthenticationEntryPointException.class)
public CommonResult authenticationEntryPointException(HttpServletRequest request, CAuthenticationEntryPointException e) {
        return responseService.getFailResult(Integer.valueOf(getMessage("entryPointException.code")), getMessage("entryPointException.msg"));
}
SpringSecurityConfiguration에 CustomAuthenticationEntryPoint 설정 추가
.exceptionHandling().authenticationEntryPoint(new CustomAuthenticationEntryPoint())를 추가하고 /exception주소를 PermitAll()에 추가한다.
@Override
protected void configure(HttpSecurity http) throws Exception {
        http
            .httpBasic().disable() // rest api 이므로 기본설정 사용안함. 기본설정은 비인증시 로그인폼 화면으로 리다이렉트 된다.
            .csrf().disable() // rest api이므로 csrf 보안이 필요없으므로 disable처리.
            .sessionManagement().sessionCreationPolicy(SessionCreationPolicy.STATELESS) // jwt token으로 인증할것이므로 세션필요없으므로 생성안함.
            .and()
                .authorizeRequests() // 다음 리퀘스트에 대한 사용권한 체크
                    .antMatchers("/*/signin", "/*/signup").permitAll() // 가입 및 인증 주소는 누구나 접근가능
                    .antMatchers(HttpMethod.GET, "/exception/**", "helloworld/**").permitAll() // hellowworld로 시작하는 GET요청 리소스는 누구나 접근가능
                .anyRequest().hasRole("USER") // 그외 나머지 요청은 모두 인증된 회원만 접근 가능
            .and()
                .exceptionHandling().authenticationEntryPoint(new CustomAuthenticationEntryPoint())
            .and()
                .addFilterBefore(new JwtAuthenticationFilter(jwtTokenProvider), UsernamePasswordAuthenticationFilter.class); // jwt token 필터를 id/password 인증 필터 전에 넣어라.
}
Swagger Test

3번에 대한 해결책
3번은 Jwt토큰은 정상이라는 가정하에 Jwt토큰이 가지지 못한 권한의 리소스를 접근할 때 발생하는 오류입니다. 이 경우에는 SpringSecurity에서 제공하는 AccessDeniedHandler를 상속받아 커스터 마이징 해야 합니다. 예외가 발생할 경우 handler에서는 /exception/accessdenied로 포워딩되도록 하였습니다.
CustomAccessDeniedHandler 생성
package com.rest.api.config.security;

import lombok.extern.slf4j.Slf4j;
import org.springframework.security.access.AccessDeniedException;
import org.springframework.security.web.access.AccessDeniedHandler;
import org.springframework.stereotype.Component;

import javax.servlet.RequestDispatcher;
import javax.servlet.ServletException;
import javax.servlet.http.HttpServletRequest;
import javax.servlet.http.HttpServletResponse;
import java.io.IOException;

@Slf4j
@Component
public class CustomAccessDeniedHandler implements AccessDeniedHandler {
	@Override
	public void handle(HttpServletRequest request, HttpServletResponse response, AccessDeniedException exception) throws IOException,
            ServletException {
		response.sendRedirect("/exception/accessdenied");
	}
}
ExceptionController 수정
위에서 생성한 ExceptionController에 다음 내용을 추가합니다. 이미 존재하는 Exception이므로 커스텀 Exception은 따로 만들지 않고 기존 AccessDeniedException을 발생시킵니다.
@GetMapping(value = "/accessdenied")
public CommonResult accessdeniedException() {
        throw new AccessDeniedException("");
}
Message 내용 추가
// exception_ko.yml
accessDenied:
  code: "-1003"
  msg: "보유한 권한으로 접근할수 없는 리소스 입니다."

// exception_en.yml
accessDenied:
  code: "-1003"
  msg: "A resource that can not be accessed with the privileges it has."
ExceptionAdvice 내용 추가
@ExceptionHandler(AccessDeniedException.class)
public CommonResult AccessDeniedException(HttpServletRequest request, AccessDeniedException e) {
        return responseService.getFailResult(Integer.valueOf(getMessage("accessDenied.code")), getMessage("accessDenied.msg"));
}
SpringSecurityConfiguration에 CustomAccessDeniedHandler 설정 추가
테스트를 위해 /users api는 ROLE_ADMIN 권한만 접근 가능하게 처리해 놓습니다.
.antMatchers(“/*/users”).hasRole(“ADMIN”)
@Override
protected void configure(HttpSecurity http) throws Exception {
        http
            .httpBasic().disable() // rest api 이므로 기본설정 사용안함. 기본설정은 비인증시 로그인폼 화면으로 리다이렉트 된다.
            .csrf().disable() // rest api이므로 csrf 보안이 필요없으므로 disable처리.
            .sessionManagement().sessionCreationPolicy(SessionCreationPolicy.STATELESS) // jwt token으로 인증할것이므로 세션필요없으므로 생성안함.
            .and()
                .authorizeRequests() // 다음 리퀘스트에 대한 사용권한 체크
                    .antMatchers("/*/signin", "/*/signup").permitAll() // 가입 및 인증 주소는 누구나 접근가능
                    .antMatchers(HttpMethod.GET, "/exception/**", "helloworld/**").permitAll() // hellowworld로 시작하는 GET요청 리소스는 누구나 접근가능
                .antMatchers("/*/users").hasRole("ADMIN")
                .anyRequest().hasRole("USER") // 그외 나머지 요청은 모두 인증된 회원만 접근 가능
            .and()
                .exceptionHandling().accessDeniedHandler(new CustomAccessDeniedHandler())
            .and()
                .exceptionHandling().authenticationEntryPoint(new CustomAuthenticationEntryPoint())
            .and()
                .addFilterBefore(new JwtAuthenticationFilter(jwtTokenProvider), UsernamePasswordAuthenticationFilter.class); // jwt token 필터를 id/password 인증 필터 전에 넣어라.
}
Swagger Test

예외 처리 고도화까지 잘 적용되었음을 확인하였습니다. 이제 서버는 어느 정도의 보안성을 갖추게 되었습니다. SpringSecurity를 적용하지 않고 동일한 프로세스를 처음부터 만들려고 했으면, 많은 고난과 예외상황에 대한 대처를 위해 수많은 시간과 노력이 필요했을 것입니다. 그렇지만 SpringSecurity를 적용하는데도 상당한 지식과 노력이 필요합니다. 본문에 나온 내용은 Security의 일부 내용일 뿐입니다. 그만큼 SpringSecurity 내용은 방대합니다. 이 글을 통해 서버를 보다 더 견고하게 만드는 첫걸음이 되었으면 좋겠습니다.
추가) annotation으로 리소스 접근 권한 설정
실습에서는 리소스에 대한 접근권한 설정시 아래와 같이 SecurityConfiguration.java의 configure(HttpSecurity http) 메서드 내부에서 authorizeRequests()를 통해 세팅하였습니다. 이렇게 하면 리소스의 권한을 중앙관리한다는 점에서 이점이 있는데요. 추가로 Spring에서는 annotation으로도 권한 설정이 가능하도록 지원하고 있습니다. 각각의 방식은 장단점이 있으므로 상황에 따라 적합한 방법을 채택해 사용하면 될 것 같습니다.
    @Override
    protected void configure(HttpSecurity http) throws Exception {
        http
            // 생략...
            .and()
                .authorizeRequests() // 다음 리퀘스트에 대한 사용권한 체크
                    .antMatchers("/*/signin", "/*/signin/**", "/*/signup", "/*/signup/**", "/social/**").permitAll() // 가입 및 인증 주소는 누구나 접근가능
                    .antMatchers(HttpMethod.GET, "/exception/**", "/helloworld/**","/actuator/health", "/v1/board/**", "/favicon.ico").permitAll() // 등록된 GET요청 리소스는 누구나 접근가능
                    .anyRequest().hasRole("USER") // 그외 나머지 요청은 모두 인증된 회원만 접근 가능
            // 생략...
    }
@PreAuthorize, @Secured
권한 설정이 필요한 리소스(실습에서는 Controller의 각 메서드에 해당)에 @PreAuthorize, @Secured로 권한을 세팅할 수 있습니다. 둘다 같은 역할을 하지만 아래와 같은 차이가 있습니다.
@PreAuthorize
표현식 사용 가능
ex) @PreAuthorize(“hasRole(‘ROLE_USER’) and hasRole(‘ROLE_ADMIN’)”)
@Secured
표현식 사용 불가능
ex) @Secured({“ROLE_USER”,”ROLE_ADMIN”})
annotation으로 권한설정을 하려면 GlobalMethodSecurity를 활성화해야 합니다. 아래와 같이 SecurityConfiguration 상단에 @EnableGlobalMethodSecurity(securedEnabled = true, prePostEnabled = true)를 추가합니다. 그리고 configure 메서드 안에서 authorizeRequest() 설정은 주석 처리하거나 삭제합니다.
@EnableGlobalMethodSecurity(securedEnabled = true, prePostEnabled = true)
@RequiredArgsConstructor
@Configuration
public class SecurityConfiguration extends WebSecurityConfigurerAdapter {
생략...
    @Override
    protected void configure(HttpSecurity http) throws Exception {
        http
            .httpBasic().disable() // rest api 이므로 기본설정 사용안함. 기본설정은 비인증시 로그인폼 화면으로 리다이렉트 된다.
            .csrf().disable() // rest api이므로 csrf 보안이 필요없으므로 disable처리.
            .sessionManagement().sessionCreationPolicy(SessionCreationPolicy.STATELESS) // jwt token으로 인증할것이므로 세션필요없으므로 생성안함.
//            .and()
//                .authorizeRequests() // 다음 리퀘스트에 대한 사용권한 체크
//                    .antMatchers("/*/signin", "/*/signin/**", "/*/signup", "/*/signup/**", "/social/**").permitAll() // 가입 및 인증 주소는 누구나 접근가능
//                    .antMatchers(HttpMethod.GET, "/exception/**", "/helloworld/**","/actuator/health", "/v1/board/**", "/favicon.ico").permitAll() // 등록된 GET요청 리소스는 누구나 접근가능
//                    .anyRequest().hasRole("USER") // 그외 나머지 요청은 모두 인증된 회원만 접근 가능
            .and()
                .exceptionHandling().accessDeniedHandler(new CustomAccessDeniedHandler())
            .and()
                .exceptionHandling().authenticationEntryPoint(new CustomAuthenticationEntryPoint())
            .and()
                .addFilterBefore(new JwtAuthenticationFilter(jwtTokenProvider), UsernamePasswordAuthenticationFilter.class); // jwt token 필터를 id/password 인증 필터 전에 넣어라.

    }
생략 ...
}
Controller에 권한을 설정합니다. 만약 Controller 내부의 모든 리소스에 대하여 일괄로 동일한 권한을 설정할 것이면 Controller 상단에 annotation을 세팅합니다.
@PreAuthorize("hasRole('ROLE_USER')") 또는 @Secured("ROLE_USER")
@Api(tags = {"2. User"})
@RequiredArgsConstructor
@RestController
@RequestMapping(value = "/v1")
public class UserController {
내용 생략....
}
만약 각각의 리소스마다 권한을 설정해야 하면 해당 메서드 위에 annotation을 세팅하면 됩니다.
@Api(tags = {"2. User"})
@RequiredArgsConstructor
@RestController
@RequestMapping(value = "/v1")
public class UserController {

    private final UserJpaRepo userJpaRepo;
    private final ResponseService responseService; // 결과를 처리할 Service

    @Secured("ROLE_USER")
    @ApiImplicitParams({
            @ApiImplicitParam(name = "X-AUTH-TOKEN", value = "로그인 성공 후 access_token", required = true, dataType = "String", paramType = "header")
    })
    @ApiOperation(value = "회원 리스트 조회", notes = "모든 회원을 조회한다")
    @GetMapping(value = "/users")
    public ListResult<User> findAllUser() {
        // 결과데이터가 여러건인경우 getListResult를 이용해서 결과를 출력한다.
        return responseService.getListResult(userJpaRepo.findAll());
    }

    @PreAuthorize("hasRole('ROLE_USER')")
    @ApiImplicitParams({
            @ApiImplicitParam(name = "X-AUTH-TOKEN", value = "로그인 성공 후 access_token", required = true, dataType = "String", paramType = "header")
    })
    @ApiOperation(value = "회원 단건 조회", notes = "회원번호(msrl)로 회원을 조회한다")
    @GetMapping(value = "/user")
    public SingleResult<User> findUser() {
        // SecurityContext에서 인증받은 회원의 정보를 얻어온다.
        Authentication authentication = SecurityContextHolder.getContext().getAuthentication();
        String id = authentication.getName();
        // 결과데이터가 단일건인경우 getSingleResult를 이용해서 결과를 출력한다.
        return responseService.getSingleResult(userJpaRepo.findByUid(id).orElseThrow(CUserNotFoundException::new));
    }
  생략...
}
위에서 annotation으로 권한을 설정한 리소스 외 나머지 리소스들은 누구나 접근 가능한 리소스로 설정됩니다.
최신 소스는 GitHub 사이트를 참고해 주세요.
https://github.com/codej99/SpringRestApi/tree/feature/security
GitHub Repository를 import하여 Intellij 프로젝트를 구성하는 방법은 다음 포스팅을 참고해주세요.
Docker로 개발 환경을 빠르게 구축하는 것도 가능합니다. 다음 블로그 내용을 읽어보세요!
스프링 api 서버를 이용하여 웹사이트를 만들어보고 싶으시면 아래 포스팅을 참고해 주세요.


 사용해보기")

에 대하여")


 – H2 Database 연동")