
- Ansible을 이용한 시스템 구성관리(1) – Vagrant를 이용한 테스트 가상환경 만들기
- Ansible을 이용한 시스템 구성관리(2) – ansible로 nginx 설치 – roles, handler, template, vars
- Ansible을 이용한 시스템 구성관리(3) – ansible로 mysql(mariadb) 설치 자동화
- Ansible을 이용한 시스템 구성관리(4) – wordpress (nginx+mariadb+php) 설치 자동화
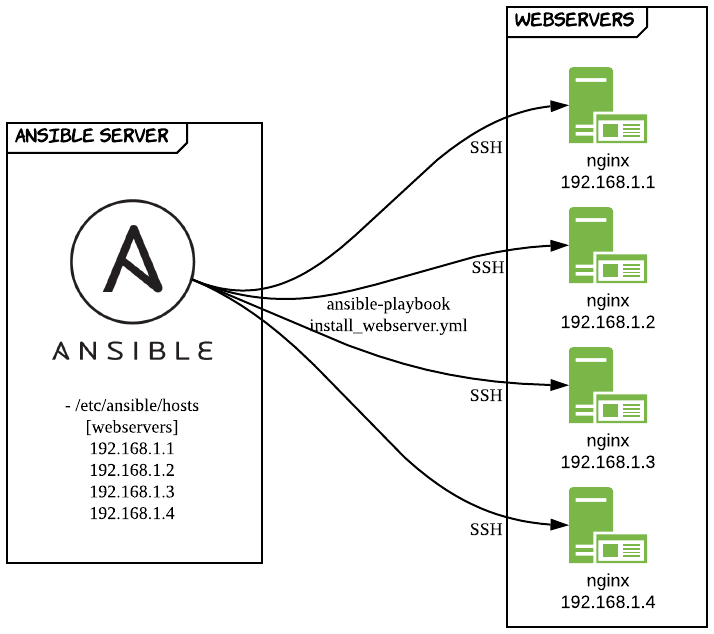
이번장에는 ansible playbook을 작성하여 nginx를 구축하고 role을 이용하여 playbook 구조를 개선해 보겠습니다. 아래 이미지는 ansible server의 hosts파일에 정의된 [webserver] inventory를 읽어 nginx 애플리케이션을 설치하는 과정을 도식화한 것입니다. 실습에서는 여건상 1대의 서버에만 playbook을 적용해보겠습니다.
gather facts
이전까지는 yml 작성시 gather_facts: no로 설정하여 사용하였습니다. 이번장에서는 해당 설정을 제거하고 사용할 것입니다. gather facts를 설정하지 않으면 ansible 서버에 사전 정의된 변수들을 수집하여 여러가지 용도로 사용할 수 있습니다. 아래와 같이 입력하면 ansible-client001에 사전 정의된 변수를 볼 수 있습니다.
$ vagrant ssh ansible-server
$ ans -m setup 192.168.1.1
localhost | SUCCESS => {
    "ansible_facts": {
        "ansible_all_ipv4_addresses": [
            "192.168.1.10",
            "10.0.2.15"
        ],
        "ansible_all_ipv6_addresses": [
            "fe80::a00:27ff:fe75:8f4",
            "fe80::5054:ff:fe8a:fee6"
        ],
        "ansible_apparmor": {
            "status": "disabled"
        },
        "ansible_architecture": "x86_64",
        "ansible_bios_date": "12/01/2006",
        "ansible_bios_version": "VirtualBox",
        "ansible_cmdline": {
            "BOOT_IMAGE": "/boot/vmlinuz-3.10.0-957.12.2.el7.x86_64",
            "LANG": "en_US.UTF-8",
            "biosdevname": "0",
            "console": "ttyS0,115200n8",
            "crashkernel": "auto",
            "elevator": "noop",
            "net.ifnames": "0",
            "no_timer_check": true,
            "ro": true,
            "root": "UUID=8ac075e3-1124-4bb6-bef7-a6811bf8b870"
        },
        ............. 생략
}
nginx 설치시엔 ansible_pkg_mgr(패키지 매니져) 변수를 사용할 것인데 해당 변수를 검색하면 yum 인것을 확인 할 수 있습니다.
$ ans -m setup 192.168.1.1 | grep ansible_pkg_mgr
"ansible_pkg_mgr": "yum"
gather facts를 사용하는 이유는 여러가지 운영체제에 동일한 애플리케이션을 설치할때 OS마다 다른 명령어나 용어를 사용하게 되는데 이것을 ansible에서 한가지로 통일해 관리하기 위함입니다.
Ubuntu에서 ansible_pkg_mgr를 조회하면 “apt”로 조회되는것을 확인할 수 있습니다.
nginx 설치
ansible 환경이 구성되었으므로 ansible-server에 접속하여 클라이언트 서버에 설치할 nginx playbook을 작성합니다.
$ vagrant ssh ansible-server
install_webserver.yml 작성
hosts에 webservers라고 지정하면 /etc/ansible/hosts의 내용을 참고하여 ansible-client001(192.168.1.1)서버에 nginx가 설치됩니다. become: yes로 설정하면 명령어를 sudo로 실행합니다. 작업(tasks)은 순서대로 다음과 같이 진행됩니다.
- epel 저장소를 최신으로 업데이트(state=latest)
- nginx 설치(state=present)
- nginx 시작(state=started)합니다.
---
- name: install nginx on the client
  hosts: webservers
  become: yes

  tasks:
      - name: install epel-release
        action: "{{ ansible_pkg_mgr }} name=epel-release state=latest"
      - name: install nginx web server
        action: "{{ ansible_pkg_mgr }} name=nginx state=present"
      - name: start nginx web server
        service: name=nginx state=started
yum module
{{ ansible_pkg_mgr }}은 centos의 경우 yum 모듈을 이용하게 되고 다음 링크에서 자세한 내용을 확인 할 수 있습니다. yum 모듈의 경우 아래와 같은 state를 사용할 수 있습니다.
https://docs.ansible.com/ansible/latest/modules/yum_module.html
설치 관련 state
- present, installed – 둘다 같은 의미로 사용합니다. 패키지를 설치합니다.
- latest – 설치되어있어도 최신 버전이 아닌 경우 지정된 패키지를 업데이트 합니다.
삭제관련 state
- absent, removed – 둘다 같은 의미로 사용됩니다. 지정한 패키지를 삭제합니다.
service module
service 모듈은 다음 링크에서 자세한 내용을 확인할 수 있고. 아래와 같은 state를 사용할 수 있습니다.
https://docs.ansible.com/ansible/latest/modules/service_module.html
- started – 서비스를 시작합니다. 필요한 경우만 동작합니다.
- stopped – 서비스를 종료합니다. 필요한 경우만 동작합니다.
- restarted – 항상 서비스를 재시작 합니다.
- reloaded – 서비스 실행을 중단하지 않고 변경된 설정만 적용합니다.
playbook 명령으로 nginx 설치
anp(ansible-playbook) 명령을 실행하면 task가 실행됩니다. 우선 syntax-check 옵션으로 playbook 문법 유효성을 체크하고 list-hosts 옵션을 통해 적용될 클라이언트를 확인한 후에 playbook을 실행합니다.
$ anp --syntax-check install_webserver.yml

playbook: install_webserver.yml
$ anp --list-hosts install_webserver.yml

playbook: install_webserver.yml

  play #1 (webservers): webservers	TAGS: []
    pattern: [u'webservers']
    hosts (1):
      192.168.1.1
$ anp install_webserver.yml

PLAY [install nginx on the client] *****************************************************************************************************************************

TASK [Gathering Facts] *****************************************************************************************************************************************
ok: [192.168.1.1]

TASK [install epel-release] ************************************************************************************************************************************
changed: [192.168.1.1]

TASK [install nginx web server] ********************************************************************************************************************************
changed: [192.168.1.1]

TASK [start nginx web server] **********************************************************************************************************************************
changed: [192.168.1.1]

PLAY RECAP *****************************************************************************************************************************************************
192.168.1.1                : ok=4    changed=3    unreachable=0    failed=0    skipped=0    rescued=0    ignored=0
nginx 설치 확인
Vagrant에서 ansible-client001의 80포트를 로컬 PC의 60081포트로 forwarded_port 해두어 로컬 PC의 브라우저에서 localhost:60081로 접속하여 아래와 같은 화면을 확인할 수 있습니다.

nginx 삭제
remove_webserver.yml 작성
install task와 내용은 별반 다르지 않습니다. state=absent로 지정하면 적용된 내용이 삭제 처리됩니다.
---
- name: Remove nginx to ansible client
  hosts: webservers
  become: yes

  tasks:
      - name: remove epel-release
        action: "{{ ansible_pkg_mgr }} name=epel-release state=absent"

      - name: remove nginx
        action: "{{ ansible_pkg_mgr }} name=nginx state=absent"
작성한 내용을 playbook 명령으로 실행하여 nginx가 삭제되는지 확인 합니다. 처리가 완료된후 localhost:60081에 다시 접속해보면 Page Not Found를 확인할 수 있습니다.
$ anp --syntax-check remove_webserver.yml

playbook: remove_webserver.yml
$ anp remove_webserver.yml
PLAY [Remove nginx to ansible client] **************************************************************************************************************************

TASK [Gathering Facts] *****************************************************************************************************************************************
ok: [192.168.1.1]

TASK [remove epel-release] *************************************************************************************************************************************
changed: [192.168.1.1]

TASK [remove nginx] ********************************************************************************************************************************************
changed: [192.168.1.1]

PLAY RECAP *****************************************************************************************************************************************************
192.168.1.1                : ok=3    changed=2    unreachable=0    failed=0    skipped=0    rescued=0    ignored=0
Role을 이용한 ansible 구조 개선
ansible에서는 role이라고 하여 표준화된 구성 방식을 제공합니다. role을 사용하면 각각의 역할별로 디렉토리를 구조화하고 task 및 handler를 자동으로 로드할 수 있습니다. 그리고 정해진 형식대로 작성되기 때문에 다른 유저에게 쉽게 공유할 수 있습니다.
role을 이용하여 nginx 설치/삭제를 개선해 보겠습니다. 아래와 같이 ansible-galaxy 명령어를 이용하면 정해진 role 구조를 자동으로 생성할 수 있습니다.
이전에 약어를 등록하였기 때문에 ang로 ang init [role이름] 명령을 실행하면 자동으로 디렉토리 구조 및 파일이 생성 됩니다. 이전 장에서 tree 패키지를 설치하였기 때문에 다음과 같이 생성된 디렉토리 구조를 확인할 수 있습니다.
$ mkdir roles
$ cd roles
$ ang init nginx
- nginx was created successfully
$ $ tree nginx
nginx
├── README.md
├── defaults
│   └── main.yml
├── files
├── handlers
│   └── main.yml
├── meta
│   └── main.yml
├── tasks
│   └── main.yml
├── templates
├── tests
│   ├── inventory
│   └── test.yml
└── vars
    └── main.yml
각 디렉토리의 역할
- tasks – role에 의해 실행될 주요 작업 목록을 포함하고 있습니다. 지금까지 작성했던 yml들이 tasks에 들어간다고 보면 됩니다.
defaults – 우선순위가 낮은 기본 변수 집합이 들어갑니다. 보통 공용으로 사용하는 변수를 세팅합니다.
files – role로 배포할 수 있는 파일이 들어 있습니다. role을 구성하는 동안 클라이언트로 보내야 하는 파일이 들어 있습니다.
handlers – role 또는 role 외부에서 사용될 수 있는 핸들러가 위치하고 있습니다.
meta – role에 대한 메타 데이터를 정의합니다. 기본적으로 role 종속성을 설정하는 파일이 포함되어 있습니다. 작성자, 지원 플랫폼, 종속성과 같은 role의 메타 데이터를 포함합니다.
templates – role 구성시 수정을 지원하는 파일 템플릿이 위치합니다. 템플릿을 만들 때 Jinja2 템플릿 언어를 사용하여 작성하며 조건에 따라 유동적으로 내용이 변경되야 하는 파일을 만들 수 있습니다.
vars – 변수 집합이 저장됩니다. defaults에 설정된 변수 보다 우선순위가 높게 적용됩니다.
기존 nginx 설치/삭제 작업 playbook을 tasks 하위로 이동
$ cp install_webserver.yml ./roles/nginx/tasks/install.yml
$ cp remove_webserver.yml ./roles/nginx/tasks/remove.yml
tasks 하위 내용만 남기고 삭제
- roles/nginx/tasks/install.yml
---
  - name: install epel-release
    action: "{{ ansible_pkg_mgr }} name=epel-release state=latest"
  - name: install nginx web server
    action: "{{ ansible_pkg_mgr }} name=nginx state=present"
  - name: start nginx web server
    service: name=nginx state=started
- roles/nginx/tasks/remove.yml
---
  - name: remove epel-release
    action: "{{ ansible_pkg_mgr }} name=epel-release state=absent"
  - name: remove nginx
    action: "{{ ansible_pkg_mgr }} name=nginx state=absent"
task를 실행하는 playbook 생성
- roles/nginx/install_webserver.yml
---
   - hosts: webservers
     become: yes

     tasks:
        - include: tasks/install.yml
- roles/nginx/remove_webserver.yml
---
   - hosts: webservers
     become: yes

     tasks:
        - include: tasks/remove.yml
playbook 실행
role을 실행하면 기존과 동일하게 동작하는 것을 확인할 수 있습니다.
$ anp install_webserver.yml
PLAY [webservers] **********************************************************************************************************************************************

TASK [Gathering Facts] *****************************************************************************************************************************************
ok: [192.168.1.1]

TASK [install epel-release] ************************************************************************************************************************************
changed: [192.168.1.1]

TASK [install nginx web server] ********************************************************************************************************************************
changed: [192.168.1.1]

TASK [start nginx web server] **********************************************************************************************************************************
changed: [192.168.1.1]

PLAY RECAP *****************************************************************************************************************************************************
192.168.1.1                : ok=4    changed=3    unreachable=0    failed=0    skipped=0    rescued=0    ignored=0

$ anp remove_webserver.yml
PLAY [webservers] **********************************************************************************************************************************************

TASK [Gathering Facts] *****************************************************************************************************************************************
ok: [192.168.1.1]

TASK [remove epel-release] *************************************************************************************************************************************
changed: [192.168.1.1]

TASK [remove nginx] ********************************************************************************************************************************************
changed: [192.168.1.1]

PLAY RECAP *****************************************************************************************************************************************************
192.168.1.1                : ok=3    changed=2    unreachable=0    failed=0    skipped=0    rescued=0    ignored=0
디렉토리 구조
$ tree nginx
nginx
|-- README.md
|-- defaults
|   `-- main.yml
|-- files
|-- handlers
|   `-- main.yml
|-- install_webserver.yml
|-- meta
|   `-- main.yml
|-- remove_webserver.yml
|-- tasks
|   |-- install.yml
|   |-- main.yml
|   `-- remove.yml
|-- templates
|-- tests
|   |-- inventory
|   `-- test.yml
`-- vars
    `-- main.yml
Handler로 기능 분리
handler를 이용하면 작업을 분리하여 재사용 할수 있습니다. handlers 디렉토리 하위의 main.yml에 nginx start, restart task를 작성합니다.
- roles/nginx/handlers/main.yml
- name: start nginx web server
  action: service name=nginx state=started
- name: restart nginx web server
  action: service name=nginx state=restarted
- roles/nginx/install_webserver.yml에 handlers 경로를 include 합니다
---
   - hosts: webservers
     become: yes

     tasks:
        - include: tasks/install.yml

     handlers:
        - include: handlers/main.yml
- roles/nginx/task/install.yml에 notify로 handler를 호출하여 nginx를 시작하도록 추가합니다.
---
  - name: install epel-release
    action: "{{ ansible_pkg_mgr }} name=epel-release state=latest"
  - name: install nginx web server
    action: "{{ ansible_pkg_mgr }} name=nginx state=present"
    notify:
       - start nginx web server
ansible playbook명령으로 nginx를 다시 설치해봅니다. log에 ‘RUNNING HANDLER’라고 표시되며 handler가 작동되는 것을 확인할 수 있습니다.
$ anp install_webserver.yml
PLAY [webservers] **********************************************************************************************************************************************

TASK [Gathering Facts] *****************************************************************************************************************************************
ok: [192.168.1.1]

TASK [install epel-release] ************************************************************************************************************************************
changed: [192.168.1.1]

TASK [install nginx web server] ********************************************************************************************************************************
changed: [192.168.1.1]

RUNNING HANDLER [start nginx web server] ***********************************************************************************************************************
changed: [192.168.1.1]

PLAY RECAP *****************************************************************************************************************************************************
192.168.1.1                : ok=4    changed=3    unreachable=0    failed=0    skipped=0    rescued=0    ignored=0
Template 사용하기
어떤 애플리케이션을 설치하든 설정값의 수정이 빈번하게 발생합니다. 설정값을 default로 사용하는 경우도 있지만 대부분 값을 상황에 맞게 튜닝하여 사용하는 경우가 대부분입니다. 이와 같은 경우에 nginx가 설치된 각 서버에 접속하여 conf 파일 내용을 수정할 수도 있겠지만 template화 하면 ansible을 통해 설정을 빠르게 수정하고 모든 클라이언트에 쉽게 적용할 수 있습니다.
template이란 정형화된 틀이라고 생각하면 됩니다. ansible에서는 template 디렉터리 하위에 template 파일들을 위치시키는데 jinja2 형식의 파일이며. j2 확장자를 붙입니다. 공통으로 클라이언트에 배포되어야 하는 파일들( 예를 들면 conf 파일등 )을 template화 하는 것이 적합합니다. 또한 jinja2 파일은 변경되는 값을 변수로 지정하여 외부에서 주입할 수 있도록 되어있으므로, 파일 내용을 유동적으로 생성할 수 있습니다.
자세한 내용은 아래 링크에서 확인 할 수 있습니다.
https://docs.ansible.com/ansible/latest/user_guide/playbooks_templating.html
nginx.conf 파일을 jinja2 파일로 변경
nginx 설치 후 변경을 가하지 않은 상태의 nginx.conf 파일의 원본 내용은 다음과 같습니다.
- /etc/nginx/nginx.conf
# For more information on configuration, see:
#   * Official English Documentation: http://nginx.org/en/docs/
#   * Official Russian Documentation: http://nginx.org/ru/docs/

user nginx;
worker_processes auto;
error_log /var/log/nginx/error.log;
pid /run/nginx.pid;

# Load dynamic modules. See /usr/share/nginx/README.dynamic.
include /usr/share/nginx/modules/*.conf;

events {
    worker_connections 1024;
}

http {
    log_format  main  '$remote_addr - $remote_user [$time_local] "$request" '
                      '$status $body_bytes_sent "$http_referer" '
                      '"$http_user_agent" "$http_x_forwarded_for"';

    access_log  /var/log/nginx/access.log  main;

    sendfile            on;
    tcp_nopush          on;
    tcp_nodelay         on;
    keepalive_timeout   65;
    types_hash_max_size 2048;

    include             /etc/nginx/mime.types;
    default_type        application/octet-stream;

    # Load modular configuration files from the /etc/nginx/conf.d directory.
    # See http://nginx.org/en/docs/ngx_core_module.html#include
    # for more information.
    include /etc/nginx/conf.d/*.conf;

    server {
        listen       80 default_server;
        listen       [::]:80 default_server;
        server_name  _;
        root         /usr/share/nginx/html;

        # Load configuration files for the default server block.
        include /etc/nginx/default.d/*.conf;

        location / {
        }

        error_page 404 /404.html;
            location = /40x.html {
        }

        error_page 500 502 503 504 /50x.html;
            location = /50x.html {
        }
    }

# Settings for a TLS enabled server.
#
#    server {
#        listen       443 ssl http2 default_server;
#        listen       [::]:443 ssl http2 default_server;
#        server_name  _;
#        root         /usr/share/nginx/html;
#
#        ssl_certificate "/etc/pki/nginx/server.crt";
#        ssl_certificate_key "/etc/pki/nginx/private/server.key";
#        ssl_session_cache shared:SSL:1m;
#        ssl_session_timeout  10m;
#        ssl_ciphers HIGH:!aNULL:!MD5;
#        ssl_prefer_server_ciphers on;
#
#        # Load configuration files for the default server block.
#        include /etc/nginx/default.d/*.conf;
#
#        location / {
#        }
#
#        error_page 404 /404.html;
#            location = /40x.html {
#        }
#
#        error_page 500 502 503 504 /50x.html;
#            location = /50x.html {
#        }
#    }
}
ansible-server에 구성한 roles/nginx/template 하위에 nginx.conf.j2를 작성합니다. 유동적인 값에 대해서는 {{ 변수명 }}으로 처리를 합니다. 아래에서는 간단한 실습을 위해 변수의 대체만 사용했지만 if문을 이용한 조건 주입이나 for문을 이용한 반복 처리도 가능합니다. 필요한 부분만 남기고 유동적인 부분을 변수화 시킨 jinja2 파일 내용은 다음과 같습니다.
$ vi ./roles/nginx/templates/nginx.conf.j2
user nginx;
worker_processes {{ nginx.processor_count }};
error_log /var/log/nginx/error.log;
pid /run/nginx.pid;

include /usr/share/nginx/modules/*.conf;

events {
    worker_connections {{ nginx.max_worker_connection }};
}

http {
    log_format  main  '$remote_addr - $remote_user [$time_local] "$request" '
                      '$status $body_bytes_sent "$http_referer" '
                      '"$http_user_agent" "$http_x_forwarded_for"';

    access_log  {{ nginx.log_dir }}/{{ nginx.access_log_name }}  main;

    sendfile            on;
    tcp_nopush          on;
    tcp_nodelay         on;
    keepalive_timeout   65;
    types_hash_max_size 2048;

    include             /etc/nginx/mime.types;
    default_type        application/octet-stream;

    include /etc/nginx/conf.d/*.conf;

    server {
        listen       {{ nginx.port }} default_server;
        listen       [::]:{{ nginx.port }} default_server;
        server_name  _;
        root         /usr/share/nginx/html;

        # Load configuration files for the default server block.
        include /etc/nginx/default.d/*.conf;

        location / {
        }

        error_page 404 /404.html;
            location = /40x.html {
        }

        error_page 500 502 503 504 /50x.html;
            location = /50x.html {
        }
    }
}
template에 사용한 변수에 적용할 값은 vars 디렉토리 하위의 main.yml에 작성합니다.
- roles/nginx/vars/main.yml
---
# vars file for nginx
nginx:
    processor_count: 30
    max_worker_connection: 512
    log_dir: /var/log/nginx
    access_log_name: access.log
    port: 80
변수를 사용할 수 있도록 playbook에 vars/main.yml을 include 합니다.
- roles/nginx/install_webserver.yml
---
   - hosts: webservers
     become: yes
     vars_files:
        - vars/main.yml
     tasks:
        - include: tasks/install.yml
     handlers:
        - include: handlers/main.yml
install task에 nginx.conf.j2의 내용을 client서버에 적용하도록 액션을 추가합니다.
- roles/nginx/tasks/install.yml
---
  - name: install epel-release
    action: "{{ ansible_pkg_mgr }} name=epel-release state=latest"
  - name: install nginx web server
    action: "{{ ansible_pkg_mgr }} name=nginx state=present"
  - name: write nginx.conf
    action: template src=templates/nginx.conf.j2 dest=/etc/nginx/nginx.conf
    notify:
       - start nginx web server
playbook 테스트
기존에 nginx가 설치되어있다면 삭제 후 재설치 합니다.
$ anp remove_webserver.yml
PLAY [webservers] **********************************************************************************************************************************************

TASK [Gathering Facts] *****************************************************************************************************************************************
ok: [192.168.1.1]

TASK [remove epel-release] *************************************************************************************************************************************
changed: [192.168.1.1]

TASK [remove nginx] ********************************************************************************************************************************************
changed: [192.168.1.1]

PLAY RECAP *****************************************************************************************************************************************************
192.168.1.1                : ok=3    changed=2    unreachable=0    failed=0    skipped=0    rescued=0    ignored=0

$ anp install_webserver.yml
PLAY [webservers] **********************************************************************************************************************************************

TASK [Gathering Facts] *****************************************************************************************************************************************
ok: [192.168.1.1]

TASK [install epel-release] ************************************************************************************************************************************
changed: [192.168.1.1]

TASK [install nginx web server] ********************************************************************************************************************************
changed: [192.168.1.1]

TASK [write nginx.conf] ****************************************************************************************************************************************
changed: [192.168.1.1]

RUNNING HANDLER [start nginx web server] ***********************************************************************************************************************
changed: [192.168.1.1]

PLAY RECAP *****************************************************************************************************************************************************
192.168.1.1                : ok=5    changed=4    unreachable=0    failed=0    skipped=0    rescued=0    ignored=0
클라이언트 서버에 접속하여 nginx.conf의 내용을 확인해 봅니다. ansible로 적용한 내용이 반영된 것을 확인할 수 있습니다.
$ vagrant ssh ansible-client001
$ cat /etc/nginx/nginx.conf
user nginx;
worker_processes 30;
error_log /var/log/nginx/error.log;
pid /run/nginx.pid;

include /usr/share/nginx/modules/*.conf;

events {
    worker_connections 512;
}

http {
    log_format  main  '$remote_addr - $remote_user [$time_local] "$request" '
                      '$status $body_bytes_sent "$http_referer" '
                      '"$http_user_agent" "$http_x_forwarded_for"';

    access_log  /var/log/nginx/access.log  main;

    sendfile            on;
    tcp_nopush          on;
    tcp_nodelay         on;
    keepalive_timeout   65;
    types_hash_max_size 2048;

    include             /etc/nginx/mime.types;
    default_type        application/octet-stream;

    include /etc/nginx/conf.d/*.conf;

    server {
        listen       80 default_server;
        listen       [::]:80 default_server;
        server_name  _;
        root         /usr/share/nginx/html;

        # Load configuration files for the default server block.
        include /etc/nginx/default.d/*.conf;

        location / {
        }

        error_page 404 /404.html;
            location = /40x.html {
        }

        error_page 500 502 503 504 /50x.html;
            location = /50x.html {
        }
    }
}
실습을 통해 nginx 애플리케이션 설치를 자동화해보았습니다. 한번 작성한 playbook은 재사용이 가능합니다. 실무에서는 간단하게 hosts 파일의 inventory에 클라이언트 서버를 추가하는 것만으로 다수의 서버에 nginx 애플리케이션을 손쉽게 구축할 수 있습니다.
실습시 사용한 소스는 아래 github에서 확인할 수 있습니다.
https://github.com/codej99/ansible-web-application.git
 – Scala로 테스트 코드 작성하기")
 – 환경 구축 및 Recorder를 이용한 테스트코드 생성")

 사용해보기")


 – 환경 구축 및 Recorder를 이용한 테스트코드 생성")
