Angular 프레임웍에서 웹페이지는 컴포넌트의 집합으로 표시됩니다. 또한 웹페이지를 브라우저에서 출력하기 위해서는 유일한 URL이 필요합니다. Angular에서는 이렇게 유일한 URL과 컴포넌트 사이를 맵핑하는 기능을 제공하는데 이것을 Routing이라고 합니다.
Angualr 프로젝트 생성 시에는 아래와 같이 Routing을 추가할 것인지 묻습니다. y를 입력하면 기본으로 Routing 설정 파일을 생성한 채로 프로젝트가 생성됩니다.
$ ng new angular-starter
? Would you like to add Angular routing? (y/N) y
만약 생성시 Routing설정을 하지 않았다면 다음과 같이 수동으로 파일을 생성하고 app.module.ts에 추가해 줘야 합니다.
// src/app/app-routing.module.ts
import { NgModule } from '@angular/core';
import { Routes, RouterModule } from '@angular/router';

const routes: Routes = [];

@NgModule({
  imports: [RouterModule.forRoot(routes)],
  exports: [RouterModule]
})
export class AppRoutingModule { }
app.module.ts import에 추가
imports: [
    AppRoutingModule,
    ...
]
컴포넌트를 Routing에 추가하기
app.component.html 수정
app.component.html에 원래 있던 내용을 없애고 <router-outlet>으로 대체합니다. 해당 태그공간에는 routing된 페이지의 결과가 표시됩니다.
<router-outlet></router-outlet>
새로운 Home 컴포넌트를 생성합니다.
$ ng g c home
CREATE src/app/home/home.component.html (19 bytes)
CREATE src/app/home/home.component.spec.ts (614 bytes)
CREATE src/app/home/home.component.ts (261 bytes)
CREATE src/app/home/home.component.css (0 bytes)
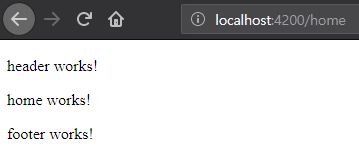
Routing에 추가한 후에 브라우저로 접근해 봅니다. 라우팅 기능이 정상적으로 처리되는것을 확인할 수 있습니다. http://localhost:4200/home
// app-routing.modules.ts
const routes: Routes = [
  { path: 'home', component: HomeComponent}
];

Root 주소로 접근하면 특정 url로 리다이렉트하는 것도 가능합니다. 아래는 Root로 접근시 home으로 리다이렉트 되도록 처리한 예제입니다.
( http://localhost:4200 접근시 http://localhost:4200/home로 리다이렉트 됩니다. )
// app-routing.modules.ts
const routes: Routes = [
  { path: '', redirectTo: '/home', pathMatch: 'full' },
  { path: 'home', component: HomeComponent }
];
Layout 구성하기
대부분의 웹페이지는 header, footer와 같은 공통 화면안에 내용이 펼쳐지는 구조로 되어있습니다. 이번에는 라우팅을 이용하여 여러가지 Layout을 구성하는 방법을 실습하겠습니다.
header, footer, commonlayout 컴포넌트 생성
$ ng g c header
$ ng g c footer
$ ng g c commonLayout
commonLayout에 header, footer include
common-layout.component.html 내용을 삭제하고 다음과 같이 변경합니다. app-header와 app-footer를 include하고 가운데에는 router-outlet이란 태그를 위치시킵니다. router-outlet은 URL에 따라 Routing된 컴포넌트가 출력되는 공간입니다.
// common-layout.component.html
<app-header></app-header>
<router-outlet></router-outlet>
<app-footer></app-footer>
home에 commonLayout 적용
다음과 같이 router설정을 중첩 형태로 변경하면 레이아웃을 적용할 수 있습니다.
const routes: Routes = [
  { path: '', redirectTo: '/home', pathMatch: 'full' },
  {
    path: '', component: CommonLayoutComponent,
    children: [
      { path: 'home', component: HomeComponent }
    ]
  }
];
localhost:4200으로 접속하면 header, footer가 적용된 home 페이지를 확인할 수 있습니다.

PathVariable 적용
웹페이지에서 상세페이지를 표시할때 다음과 같은 형태의 주소로 구성하는 경우가 있습니다.
localhost:4200/book/{bookId}
이와같이 path는 동일한데 bookId만 변경되는 경우에 대해서 처리 해보겠습니다.
book 컴포넌트 생성
$ ng g c book
routing 설정에 book path 추가
path설정시 세미콜론:변수명으로 설정하면 해당 id값으로 path variable을 설정할 수 있습니다.
const routes: Routes = [
  { path: '', redirectTo: '/home', pathMatch: 'full' },
  {
    path: '', component: CommonLayoutComponent,
    children: [
      { path: 'home', component: HomeComponent },
      { path: 'book/:bookId', component: BookComponent }
    ]
  }
];
BookComponent에서는 다음과 같이 bookId정보를 얻을수 있습니다. ActivatedRoute를 constructor에 선언합니다. pathvariable은 다음과 같이 this.route.paramMap.subscribe(…..);를 통해 가져올 수 있습니다.
// book.component.html
<p>book works! - bookId : {{bookId}}</p>

// book.component.ts
export class BookComponent implements OnInit {

  constructor(private route: ActivatedRoute) { }

  bookId: number;
  ngOnInit() {
    this.route.paramMap
      .subscribe((params: ParamMap) => {
        this.bookId = +params.get('bookId');
      });
  }
}
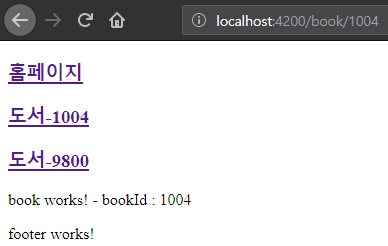
웹페이지를 실행하면 bookId에 따라 다른 데이터가 세팅되는 것을 확인 할 수 있습니다.


SPA 적용을 위한 routerLink 적용
angular는 기본으로 SPA(single page application)기반으로 동작합니다. SPA는 주소 변경시에 페이지 모두가 다시 로드되는것이 아니라 공통부분을 제외한 페이지의 내용만 일부 변경이 되는 것을 의미합니다.
header 컴포넌트 내용 변경
다음과 같이 header html 내용을 변경하여 메뉴를 구성합니다.
// header.component.html
<h3><a href='/book/1004'>도서-1004</a></h3>
<h3><a href='/book/9800'>도서-9800</a></h3>
링크 클릭시 페이지가 이동되는것을 확인 할 수 있습니다. 그런데 링크를 누를때마다 화면 전체가 리프레시 되는 것을 확인 할 수 있습니다. 전혀 SPA로 동작하지 않고 있는 것입니다.

routerLink property 적용
다음과 같이 header html을 변경합니다.
<h3><a [routerLink]="['/home']">홈페이지</a></h3>
<h3><a [routerLink]="['/book/',1004]">도서-1004</a></h3>
<h3><a [routerLink]="['/book/',9800]">도서-9800</a></h3>
이번에는 링크 클릭시 페이지 전체가 리로드 되지 않고 내용만 변경되는 것을 확인할 수 있습니다. 이와 같이 SPA로 페이지가 동작해야 하는 경우는 routerLink property로 주소를 세팅해 주어야 합니다.


