- Redis – install
- Redis – cluster
- Redis – SpringBoot2 redis cluster : strings, lists, hashs, sets, sortedsets, geo, hyperloglog
- Redis – Spring-data-redis : @Cacheable, @CachePut, @CacheEvict, @RedisHash
- Redis – spring-data-redis : 발행/구독(pub/sub) 모델의 구현
- Redis – Reactive redis
- Python으로 Redis cache 일괄 삭제 프로그램 만들기
Redis single instance 구성에 이어 cluster를 구성하는 방법을 실습해 보겠습니다.
Cluster란 각기 다른 서버를 하나로 묶어 하나의 시스템처럼 동작하게 함으로써 클라이언트에게 고가용성을 제공하는 것을 말합니다. 특징으로는 여러대의 서버에 데이터가 분산되어 저장되므로 트래픽이 분산되는 효과를 얻을수 있습니다. 가장 중요한 점은 특정 서버에 장애가 일어나더라도 백업 서버의 보완을 통해 데이터의 유실없이 서비스를 계속 이어나갈 수 있다는 점입니다.
Master로만 구성된 Cluster 구성

추가 노드 설정
Single Instance로 생성한 6300 노드 외에 아래와 같이 추가로 6301, 6302 port에 대한 노드를 추가 생성합니다. Please select the redis executable path []에는 /usr/local/bin/redis-server를 입력하면 됩니다.
$ cd redis-5.0.4
$ cd utils
$ sudo ./install_server.sh
Welcome to the redis service installer
This script will help you easily set up a running redis server

Please select the redis port for this instance: [6379] 6301
............ 이하 생략
$ sudo ./install_server.sh
Welcome to the redis service installer
This script will help you easily set up a running redis server

Please select the redis port for this instance: [6379] 6302
............ 이하 생략
$ ps -ef | grep redis
root      3194     1  0  4월24 ?      00:00:22 /usr/local/bin/redis-server 127.0.0.1:6302
root      3198     1  0  4월24 ?      00:00:22 /usr/local/bin/redis-server 127.0.0.1:6301
root      3469     1  0  4월24 ?      00:00:22 /usr/local/bin/redis-server 127.0.0.1:6300
conf에 cluster 설정 enable
기본 설정으로는 cluster 옵션이 꺼져 있으므로 활성화해야 합니다. redis설정은 /etc/redis에 포트.conf로 생성되어있습니다. 6300.conf, 6301.conf, 6302.conf에 들어가 아래와 같이 cluster 설정을 주석 해제하고 서비스를 재시작합니다. nodes.conf파일은 /var/lib/redis 하위의 port별 디렉터리에 자동으로 생성됩니다.
$ cd /etc/redis
$ sudo vi 6300.conf
cluster-enabled yes
cluster-config-file nodes.conf
cluster-node-timeout 15000
appendonly yes
$ sudo vi 6301.conf
cluster-enabled yes
cluster-config-file nodes.conf
cluster-node-timeout 15000
appendonly yes
$ sudo vi 6302.conf
cluster-enabled yes
cluster-config-file nodes.conf
cluster-node-timeout 15000
appendonly yes
$ sudo service redis_6300 restart
$ sudo service redis_6301 restart
$ sudo service redis_6302 restart
추가 라이브러리 설치
cluster 명령은 ruby로 작성되어있어 다음과 같이 라이브러리 설치가 필요합니다.
$ sudo yum install ruby ruby-devel rubygems rpm-build
$ gem install redis
노드 데이터 삭제
cluster로 연결하려 할 때 노드에 데이터가 들어있을 경우 아래와 같은 메시지가 나올 수 있습니다. 이때는 데이터를 전부 삭제하고 진행하면 됩니다.
$ redis-cli --cluster create 127.0.0.1:6300 127.0.0.1:6301 127.0.0.1:6302
[ERR] Node 127.0.0.1:6300 is not empty. Either the node already knows other nodes (check with CLUSTER NODES) or contains some key in database 0.
$ redis-cli -p 6300
127.0.0.1:6300> flushall
OK
Cluster 생성
cluster 생성이 성공할 경우 아래와 같은 로그를 확인할 수 있습니다. 물음에는 yes를 타이핑합니다.
$ redis-cli --cluster create 127.0.0.1:6300 127.0.0.1:6301 127.0.0.1:6302
>>> Performing hash slots allocation on 3 nodes...
Master[0] -> Slots 0 - 5460
Master[1] -> Slots 5461 - 10922
Master[2] -> Slots 10923 - 16383
M: 2473176fc48c5e67103c3161f6658c7899e2d892 127.0.0.1:6300
   slots:[0-5460] (5461 slots) master
M: 16141212b9040693229e5e28767d037b464bf353 127.0.0.1:6301
   slots:[5461-10922] (5462 slots) master
M: 07c080cd1692c131b63f1d2f069310e3da4d7c3e 127.0.0.1:6302
   slots:[10923-16383] (5461 slots) master
Can I set the above configuration? (type 'yes' to accept): yes
>>> Nodes configuration updated
>>> Assign a different config epoch to each node
>>> Sending CLUSTER MEET messages to join the cluster
Waiting for the cluster to join
.
>>> Performing Cluster Check (using node 127.0.0.1:6300)
M: 2473176fc48c5e67103c3161f6658c7899e2d892 127.0.0.1:6300
   slots:[0-5460] (5461 slots) master
M: 07c080cd1692c131b63f1d2f069310e3da4d7c3e 127.0.0.1:6302
   slots:[10923-16383] (5461 slots) master
M: 16141212b9040693229e5e28767d037b464bf353 127.0.0.1:6301
   slots:[5461-10922] (5462 slots) master
[OK] All nodes agree about slots configuration.
>>> Check for open slots...
>>> Check slots coverage...
[OK] All 16384 slots covered.
클러스터 정보 확인
설치된 노드 아무곳에 들어가서 cluster info를 확인합니다. 다음과 같이 3개의 노드가 묶여있는 것을 확인할 수 있습니다. cluster nodes를 입력하여 노드 정보를 확인합니다. 아래처럼 각 노드들의 자세한 정보를 확인할수 있습니다. 3개의 서버노드들은 16384개의 slot을 1/3씩 할당받아 사용하고 있는것을 볼수 있습니다. 이것은 데이터 분산과 관련 있는데요. 아래에서 설명하겠습니다.
$ redis-cli -c -p 6300
127.0.0.1:6300> cluster info
cluster_state:ok
cluster_slots_assigned:16384
cluster_slots_ok:16384
cluster_slots_pfail:0
cluster_slots_fail:0
cluster_known_nodes:3
cluster_size:3
cluster_current_epoch:3
cluster_my_epoch:3
cluster_stats_messages_ping_sent:3406
cluster_stats_messages_pong_sent:3203
cluster_stats_messages_meet_sent:2
cluster_stats_messages_sent:6611
cluster_stats_messages_ping_received:3203
cluster_stats_messages_pong_received:3408
cluster_stats_messages_received:6611
127.0.0.1:6300> cluster nodes
4846c2a8ffeba07db87fa7e0df974f1c6f638848 127.0.0.1:6302@16302 master - 0 1556499657000 3 connected 10923-16383
71c7c7b3f22b63dbe806f2f07d1987068ea29638 127.0.0.1:6300@16300 myself,master - 0 1556499657000 9 connected 0-5460
2a9b989f40a7d851684f87080c1e1e0ae301f037 127.0.0.1:6301@16301 master - 0 1556499656069 2 connected 5461-10922
데이터 입력 및 확인
노드에 클러스터 모드로 접속하여 데이터를 입력해보면 입력시마다 port가 변하는 것을 볼 수 있습니다. redis cluster의 경우는 위에서 언급했듯이 내부적으로 slot을 가지고 있는데 특정 알고리즘으로 key값을 변환하여 실제 데이터가 저장될 slot을 결정하게 됩니다. 따라서 데이터를 저장하거나 가져올때 해당 key가 저장된 slot을 가진 노드가 아닐 경우 자동으로 해당되는 노드로 리다이렉트 되는 과정이 발생하게 됩니다. 클라이언트 입장에서는 어느 서버에서 조회해도 알아서 클러스터가 해당 키가 속한 노드의 서버로 이동시켜 주므로 데이터가 어느 서버에 저장되었는지 신경쓸 필요가 없게 됩니다.
$ redis-cli -c -p 6300
127.0.0.1:6300> set a a
-> Redirected to slot [15495] located at 127.0.0.1:6302
OK
127.0.0.1:6302> set b b
-> Redirected to slot [3300] located at 127.0.0.1:6300
OK
127.0.0.1:6300> set c c
-> Redirected to slot [7365] located at 127.0.0.1:6301
OK
127.0.0.1:6301> set d d
-> Redirected to slot [11298] located at 127.0.0.1:6302
OK
127.0.0.1:6302> set e e
Redis 설정 정보 위치
시작 종료 스크립트 – /etc/init.d/redis_{포트번호}
conf 파일 위치 – /etc/redis/{포트번호}.conf
dump파일, nodes.conf 파일 위치 – /var/lib/redis/{포트번호}
로그 파일 위치 – /var/log/redis_{포트번호}.log
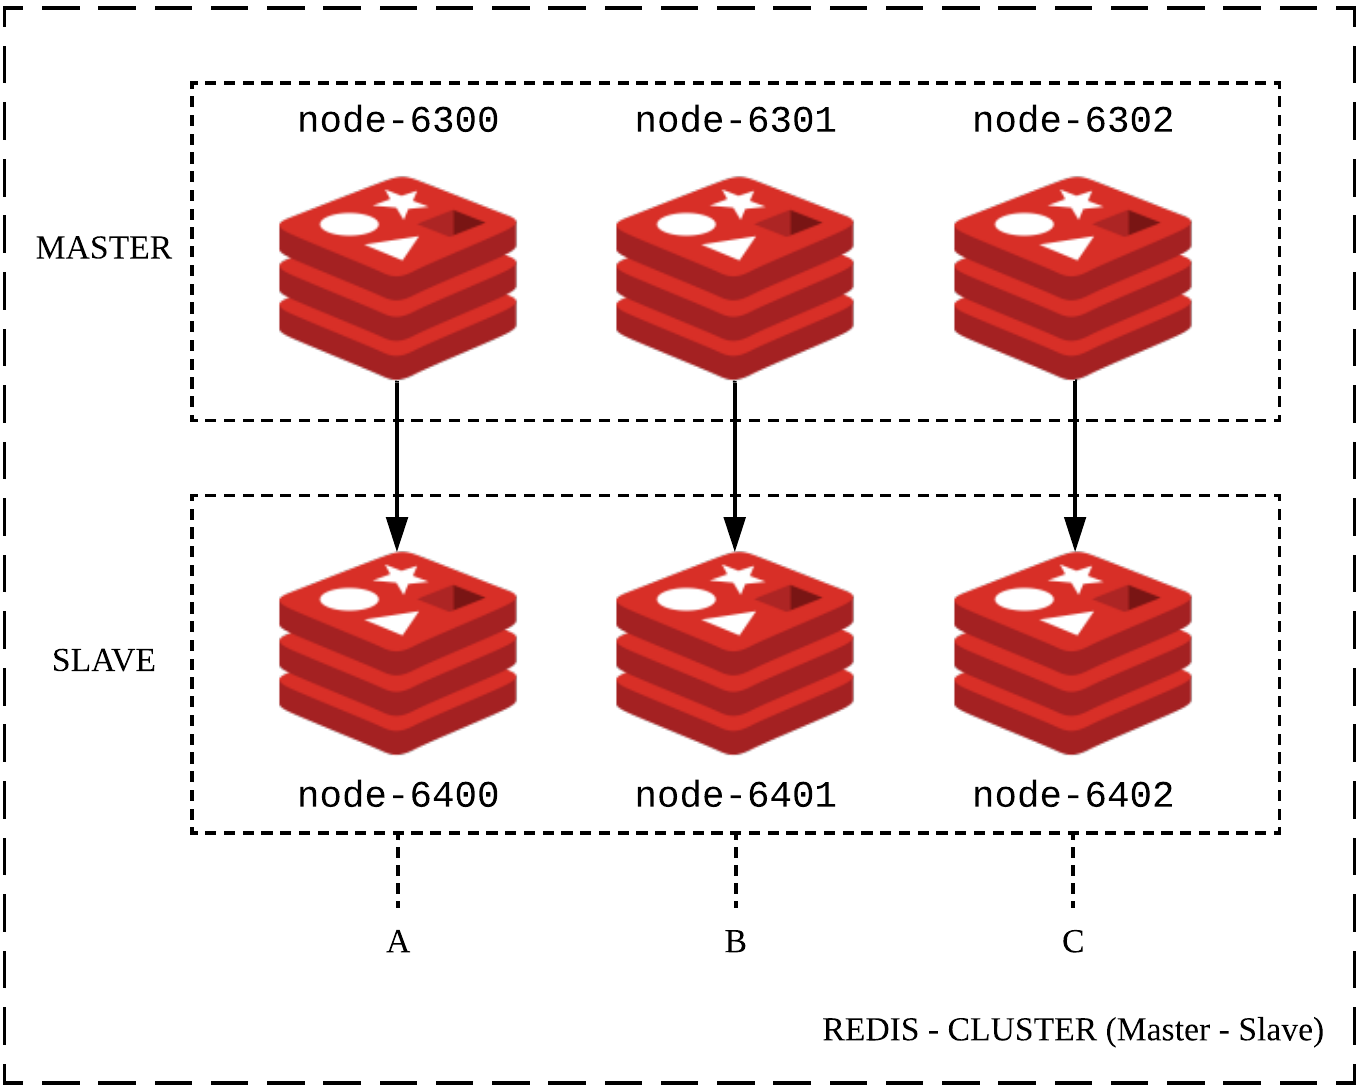
Master – Slave 구조의 Cluster 구성
위와 같이 클러스터를 Master로만 구성하면 노드중 하나에만 장애가 발생해도 해당 노드의 데이터에 유실이 발생합니다. 위와같이 구성하면 데이터를 수평 확장한다는 것 외에는 장점이 없게 됩니다. 따라서 제대로 클러스터를 구성하려면 Slave도 같이 구축해야 합니다.
Slave를 추가로 구성하면 Master의 내용을 복제하여 가지고 있게 되므로 장애가 나더라도 Slave노드가 Master로 승격 되면서 중단없이 서비스를 제공할 수 있게 됩니다. 따라서 클러스터 구성시에는 꼭 Master-Slave 구조로 클러스터를 구성해야 합니다. 또한 하나의 서버에 동일한 데이터를 가진 마스터와 슬레이브가 동시에 존재하지 않도록 장비를 구성하는 것이 중요합니다. 서버 하나가 사망했을때 해당 장비에 Master와 백업본 Slave가 같이 있으면 데이터를 복구할 수 없기 때문입니다. 아래 예제는 한 서버에 포트만 달리해서 여러 노드를 띄운 예제입니다. 장비가 서로 다르다면 ip가 틀리므로 노드 전부 ip를 6300으로 통일해도 됩니다.
Redis cluster 구성시 Port 개방
Redis cluster 구성시 여러 대의 장비로 구성하는 경우 각각 장비의 노드 간에 통신하기 위한 포트가 열려 있어야 합니다. 해당 포트는 인스턴스의 Port + 10000입니다. 6300이면 TCP port 16300가 열려있어야 합니다.
Slave용 추가 노드 설정
6400번대로 하여 Slave 노드를 3개 생성합니다. Please select the redis executable path [] 에는 /usr/local/bin/redis-server를 입력하면 됩니다.
$ cd redis-5.0.4
$ cd utils
$ sudo ./install_server.sh
Welcome to the redis service installer
This script will help you easily set up a running redis server

Please select the redis port for this instance: [6379] 6400
............ 이하 생략
$ sudo ./install_server.sh
Welcome to the redis service installer
This script will help you easily set up a running redis server

Please select the redis port for this instance: [6379] 6401
............ 이하 생략
$ sudo ./install_server.sh
Welcome to the redis service installer
This script will help you easily set up a running redis server

Please select the redis port for this instance: [6379] 6402
............ 이하 생략
$ ps -ef | grep redis
root      5606     1  0 03:04 ?        00:00:06 /usr/local/bin/redis-server 127.0.0.1:6300 [cluster]
root      5631     1  0 03:04 ?        00:00:06 /usr/local/bin/redis-server 127.0.0.1:6301 [cluster]
root      5655     1  0 03:05 ?        00:00:06 /usr/local/bin/redis-server 127.0.0.1:6302 [cluster]
root      9077     1  0 05:13 ?        00:00:00 /usr/local/bin/redis-server 127.0.0.1:6400
root      9104     1  0 05:13 ?        00:00:00 /usr/local/bin/redis-server 127.0.0.1:6401
root      9130     1  0 05:13 ?        00:00:00 /usr/local/bin/redis-server 127.0.0.1:6402
Slave 노드 클러스터 설정 enable
$ cd /etc/redis
$ sudo vi 6400.conf
cluster-enabled yes
cluster-config-file nodes.conf
cluster-node-timeout 15000
appendonly yes
$ sudo vi 6401.conf
cluster-enabled yes
cluster-config-file nodes.conf
cluster-node-timeout 15000
appendonly yes
$ sudo vi 6402.conf
cluster-enabled yes
cluster-config-file nodes.conf
cluster-node-timeout 15000
appendonly yes
$ sudo service redis_6400 start
$ sudo service redis_6401 start
$ sudo service redis_6402 start
$ ps -ef | grep redis
root      5606     1  0 03:04 ?        00:00:06 /usr/local/bin/redis-server 127.0.0.1:6300 [cluster]
root      5631     1  0 03:04 ?        00:00:06 /usr/local/bin/redis-server 127.0.0.1:6301 [cluster]
root      5655     1  0 03:05 ?        00:00:06 /usr/local/bin/redis-server 127.0.0.1:6302 [cluster]
root      9356     1  0 05:17 ?        00:00:00 /usr/local/bin/redis-server 127.0.0.1:6400 [cluster]
root      9390     1  0 05:17 ?        00:00:00 /usr/local/bin/redis-server 127.0.0.1:6401 [cluster]
root      9423     1  0 05:17 ?        00:00:00 /usr/local/bin/redis-server 127.0.0.1:6402 [cluster]
Slave 노드를 클러스터에 추가
다음의 명령으로 새로운 노드를 Slave로 클러스터에 등록합니다
cluster info를 확인하면 각각의 마스터 노드에 slave가 할당된 것을 확인할 수 있습니다.
$ redis-cli --cluster add-node 127.0.0.1:6400 127.0.0.1:6300 --cluster-slave
$ redis-cli --cluster add-node 127.0.0.1:6401 127.0.0.1:6301 --cluster-slave
$ redis-cli --cluster add-node 127.0.0.1:6402 127.0.0.1:6302 --cluster-slave
$ redis-cli --cluster info 127.0.0.1:6300
127.0.0.1:6300 (2473176f...) -> 0 keys | 5461 slots | 1 slaves.
127.0.0.1:6302 (07c080cd...) -> 0 keys | 5461 slots | 1 slaves.
127.0.0.1:6301 (16141212...) -> 0 keys | 5462 slots | 1 slaves.
[OK] 0 keys in 3 masters.
0.00 keys per slot on average.
만약 6개의 Redis 노드만 만들고 클러스터를 구성하지 않았다면 다음 명령으로 Master-Slave구조의 Cluster를 한 번에 구성할 수 있습니다.
$ redis-cli --cluster create 127.0.0.1:6300 127.0.0.1:6301 127.0.0.1:6302 127.0.0.1:6400 127.0.0.1:6401 127.0.0.1:6402 --cluster-replicas 1
>>> Performing hash slots allocation on 6 nodes...
Master[0] -> Slots 0 - 5460
Master[1] -> Slots 5461 - 10922
Master[2] -> Slots 10923 - 16383
Adding replica 127.0.0.1:6401 to 127.0.0.1:6300
Adding replica 127.0.0.1:6402 to 127.0.0.1:6301
Adding replica 127.0.0.1:6400 to 127.0.0.1:6302
>>> Trying to optimize slaves allocation for anti-affinity
[WARNING] Some slaves are in the same host as their master
M: 71c7c7b3f22b63dbe806f2f07d1987068ea29638 127.0.0.1:6300
   slots:[0-5460] (5461 slots) master
M: 2a9b989f40a7d851684f87080c1e1e0ae301f037 127.0.0.1:6301
   slots:[5461-10922] (5462 slots) master
M: 4846c2a8ffeba07db87fa7e0df974f1c6f638848 127.0.0.1:6302
   slots:[10923-16383] (5461 slots) master
S: b7e3223bc79234ad628f87efbf1ecc041b3dce6f 127.0.0.1:6400
   replicates 71c7c7b3f22b63dbe806f2f07d1987068ea29638
S: 662445847769eab6657b92452da69cf852859950 127.0.0.1:6401
   replicates 2a9b989f40a7d851684f87080c1e1e0ae301f037
S: c811f6cc2f4174a90057080c575371989ac2ab59 127.0.0.1:6402
   replicates 4846c2a8ffeba07db87fa7e0df974f1c6f638848
Can I set the above configuration? (type 'yes' to accept): yes
>>> Nodes configuration updated
>>> Assign a different config epoch to each node
>>> Sending CLUSTER MEET messages to join the cluster
Waiting for the cluster to join
.....
>>> Performing Cluster Check (using node 127.0.0.1:6300)
M: 71c7c7b3f22b63dbe806f2f07d1987068ea29638 127.0.0.1:6300
   slots:[0-5460] (5461 slots) master
   1 additional replica(s)
M: 4846c2a8ffeba07db87fa7e0df974f1c6f638848 127.0.0.1:6302
   slots:[10923-16383] (5461 slots) master
   1 additional replica(s)
S: b7e3223bc79234ad628f87efbf1ecc041b3dce6f 127.0.0.1:6400
   slots: (0 slots) slave
   replicates 71c7c7b3f22b63dbe806f2f07d1987068ea29638
S: c811f6cc2f4174a90057080c575371989ac2ab59 127.0.0.1:6402
   slots: (0 slots) slave
   replicates 4846c2a8ffeba07db87fa7e0df974f1c6f638848
S: 662445847769eab6657b92452da69cf852859950 127.0.0.1:6401
   slots: (0 slots) slave
   replicates 2a9b989f40a7d851684f87080c1e1e0ae301f037
M: 2a9b989f40a7d851684f87080c1e1e0ae301f037 127.0.0.1:6301
   slots:[5461-10922] (5462 slots) master
   1 additional replica(s)
[OK] All nodes agree about slots configuration.
>>> Check for open slots...
>>> Check slots coverage...
[OK] All 16384 slots covered.
cluster 확인
master, slave 각각 3개의 노드가 연결된 것을 확인할 수 있습니다.
$ redis-cli -p 6300
127.0.0.1:6300> cluster nodes
662445847769eab6657b92452da69cf852859950 127.0.0.1:6401@16401 slave 2a9b989f40a7d851684f87080c1e1e0ae301f037 0 1556499700178 5 connected
4846c2a8ffeba07db87fa7e0df974f1c6f638848 127.0.0.1:6302@16302 master - 0 1556499702183 3 connected 10923-16383
b7e3223bc79234ad628f87efbf1ecc041b3dce6f 127.0.0.1:6400@16400 slave 71c7c7b3f22b63dbe806f2f07d1987068ea29638 0 1556499701181 9 connected
c811f6cc2f4174a90057080c575371989ac2ab59 127.0.0.1:6402@16402 slave 4846c2a8ffeba07db87fa7e0df974f1c6f638848 0 1556499702000 6 connected
71c7c7b3f22b63dbe806f2f07d1987068ea29638 127.0.0.1:6300@16300 myself,master - 0 1556499701000 9 connected 0-5460
2a9b989f40a7d851684f87080c1e1e0ae301f037 127.0.0.1:6301@16301 master - 0 1556499703186 2 connected 5461-10922
Redis Cluster 명령어
create
클러스터를 생성합니다. cluster-replicas 옵션을 주어 Slave 노드 개수를 지정할 수 있습니다
$ redis-cli –cluster create [IP:PORT목록] [–cluster-replica 슬레이브개수]
reshard
슬롯을 재할당 하기 위해 사용합니다. 노드 추가나 장애 등의 상황으로 슬롯을 다른 노드로 옮겨야 할 때 사용합니다.
$ redis-cli –cluster reshard [IP:PORT]
rebalance
노드들의 슬롯을 재분배하여 균형을 맞춥니다. 새로운 노드가 추가되었거나 노드들의 슬롯 개수가 서로 많이 다를 경우 사용합니다.
$ redis-cli –cluster rebalance [IP:PORT]
add-node
클러스터에 노드를 추가할 때 사용합니다. –cluster-slave 옵션이 없으면 master로 추가됩니다. master로 add-node 하면 reshard나 rebalance 명령을 통하여 새 노드에 슬롯을 할당해야 쓸 수 있습니다.
– 6400번 node를 master로 클러스터에 등록합니다.
$ redis-cli –cluster add-node 127.0.0.1:6400 127.0.0.1:6300
– 6400번 node를 6300번의 slave노드로 클러스터에 등록합니다.
$ redis-cli –cluster add-node 127.0.0.1:6400 127.0.0.1:6300 –cluster-slave
del-node
클러스터에서 노드를 삭제합니다. 만약 삭제하려는 노드가 master이고 슬롯이 할당되어 있다면 reshard를 통해 슬롯을 옮긴 다음에 제거할 수 있습니다. slave노드는 바로 지워집니다.
6300 노드로 접속하여 id가 3490b3ffb5aabbda695430f7cd0da2c35733c355인 노드를 삭제합니다.
$ redis-cli –cluster del-node 127.0.0.1:6300 3490b3ffb5aabbda695430f7cd0da2c35733c355
info
클러스터들의 정보를 조회합니다.
$ redis-cli –cluster info 127.0.0.1:6300
check
클러스터를 체크합니다.
$ redis-cli --cluster check 127.0.0.1:6400
127.0.0.1:6300 (2473176f...) -> 1 keys | 5461 slots | 1 slaves.
127.0.0.1:6302 (07c080cd...) -> 1 keys | 5461 slots | 1 slaves.
127.0.0.1:6301 (16141212...) -> 0 keys | 5462 slots | 1 slaves.
[OK] 2 keys in 3 masters.
0.00 keys per slot on average.
>>> Performing Cluster Check (using node 127.0.0.1:6400)
S: 3490b3ffb5aabbda695430f7cd0da2c35733c355 127.0.0.1:6400
   slots: (0 slots) slave
   replicates 2473176fc48c5e67103c3161f6658c7899e2d892
M: 2473176fc48c5e67103c3161f6658c7899e2d892 127.0.0.1:6300
   slots:[0-5460] (5461 slots) master
   1 additional replica(s)
M: 07c080cd1692c131b63f1d2f069310e3da4d7c3e 127.0.0.1:6302
   slots:[10923-16383] (5461 slots) master
   1 additional replica(s)
S: 9726821de81d780c53c714e080a9b1794011c591 127.0.0.1:6401
   slots: (0 slots) slave
   replicates 16141212b9040693229e5e28767d037b464bf353
S: 6d3b4a76ae26e2ac1e5df105f02b540838fc3747 127.0.0.1:6402
   slots: (0 slots) slave
   replicates 07c080cd1692c131b63f1d2f069310e3da4d7c3e
M: 16141212b9040693229e5e28767d037b464bf353 127.0.0.1:6301
   slots:[5461-10922] (5462 slots) master
   1 additional replica(s)
[OK] All nodes agree about slots configuration.
>>> Check for open slots...
>>> Check slots coverage...
[OK] All 16384 slots covered.
call
클러스터 내 모든 노드에 명령을 실행합니다.
$ redis-cli --cluster call 127.0.0.1:6300 get a
>>> Calling get a
127.0.0.1:6300: MOVED 15495 127.0.0.1:6302
127.0.0.1:6402: MOVED 15495 127.0.0.1:6302
127.0.0.1:6302: a
127.0.0.1:6301: MOVED 15495 127.0.0.1:6302
127.0.0.1:6401: MOVED 15495 127.0.0.1:6302
import
싱글 노드의 데이터를 다른 노드로 마이그레이션 합니다.
–cluster-copy 옵션은 마이그레이션 후에 소스 노드에 데이터가 남아있게 됩니다.
–cluster-replace 옵션은 옮기려는 노드에 이미 키가 있어 충돌이 나면 덮어 씌워서 업데이트합니다.
$ redis-cli --cluster import 127.0.0.1:6301 --cluster-from 127.0.0.1:6401 --cluster-copy --cluster-replace
cluster reset
클러스터를 해체합니다. 클러스터 노드에 데이터가 있으면 해체가 안되므로 flushall을 먼저 수행합니다.
$ redis-cli --cluster call 127.0.0.1:6300 flushall
$ redis-cli --cluster call 127.0.0.1:6300 cluster reset
create-cluster utils를 이용하여 쉽게 클러스터 설치하기
Step by Step으로 Redis Cluster를 설치해 보았습니다. 많은 작업 내용과 확인이 필요했는데요. 더 쉽게 클러스터를 설치하는 방법을 redis에서는 이미 제공하고 있습니다. 위의 방법대로 한번 해보고 Redis에 익숙해진 다음에 새로운 방법을 해보시길 바랍니다. utils를 이용한 방법은 편하긴 하지만 이미 짜인 각본대로 자동으로 생성하는 것이라 별로 배울 것이 없습니다.
Redis cluster node 생성
create-cluster util을 이용하여 6개의 redis node를 한꺼번에 생성합니다.
포트 번호의 시작번호와 생성할 노드 개수, replica개수는
create-cluster를 열어서 수정할 수 있습니다.
$ vi -R create-cluster
#!/bin/bash

# Settings
PORT=30000
TIMEOUT=2000
NODES=6
REPLICAS=1
$ cd redis설치경로/utils/create-cluster
$ ./create-cluster start
Starting 30001
Starting 30002
Starting 30003
Starting 30004
Starting 30005
Starting 30006
$ ps -ef | grep redis
ec2-user 12418     1  0 14:14 ?        00:00:00 ../../src/redis-server *:30001 [cluster]
ec2-user 12420     1  0 14:14 ?        00:00:00 ../../src/redis-server *:30002 [cluster]
ec2-user 12422     1  0 14:14 ?        00:00:00 ../../src/redis-server *:30003 [cluster]
ec2-user 12430     1  0 14:14 ?        00:00:00 ../../src/redis-server *:30004 [cluster]
ec2-user 12432     1  0 14:14 ?        00:00:00 ../../src/redis-server *:30005 [cluster]
ec2-user 12440     1  0 14:14 ?        00:00:00 ../../src/redis-server *:30006 [cluster]
Redis cluster 생성
6개의 노드, 각각 master 3, slave 3 노드가 클러스터로 묶이게 됩니다.
$ ./create-cluster create
>>> Performing hash slots allocation on 6 nodes...
Master[0] -> Slots 0 - 5460
Master[1] -> Slots 5461 - 10922
Master[2] -> Slots 10923 - 16383
Adding replica 127.0.0.1:30005 to 127.0.0.1:30001
Adding replica 127.0.0.1:30006 to 127.0.0.1:30002
Adding replica 127.0.0.1:30004 to 127.0.0.1:30003
>>> Trying to optimize slaves allocation for anti-affinity
[WARNING] Some slaves are in the same host as their master
M: 90af43c7683b3d160a8e5264b0807843828ae3ea 127.0.0.1:30001
   slots:[0-5460] (5461 slots) master
M: 60a9ac3e4c9f141bae94b59300de9f40262ce2ea 127.0.0.1:30002
   slots:[5461-10922] (5462 slots) master
M: 8928ae6ca77dd363528f3356c0b2ca95f8b5b775 127.0.0.1:30003
   slots:[10923-16383] (5461 slots) master
S: 3014b8e4bb014aa615afe2d0f11a733f0ecbf1fc 127.0.0.1:30004
   replicates 60a9ac3e4c9f141bae94b59300de9f40262ce2ea
S: cb87298ad9b5a4ce41ec7bf59e95dbf11103323f 127.0.0.1:30005
   replicates 8928ae6ca77dd363528f3356c0b2ca95f8b5b775
S: 0a0fd7ce1d02609a8068a0bffde9231d25d47ae5 127.0.0.1:30006
   replicates 90af43c7683b3d160a8e5264b0807843828ae3ea
Can I set the above configuration? (type 'yes' to accept): yes
>>> Nodes configuration updated
>>> Assign a different config epoch to each node
>>> Sending CLUSTER MEET messages to join the cluster
Waiting for the cluster to join
..
>>> Performing Cluster Check (using node 127.0.0.1:30001)
M: 90af43c7683b3d160a8e5264b0807843828ae3ea 127.0.0.1:30001
   slots:[0-5460] (5461 slots) master
   1 additional replica(s)
S: 3014b8e4bb014aa615afe2d0f11a733f0ecbf1fc 127.0.0.1:30004
   slots: (0 slots) slave
   replicates 60a9ac3e4c9f141bae94b59300de9f40262ce2ea
S: cb87298ad9b5a4ce41ec7bf59e95dbf11103323f 127.0.0.1:30005
   slots: (0 slots) slave
   replicates 8928ae6ca77dd363528f3356c0b2ca95f8b5b775
M: 8928ae6ca77dd363528f3356c0b2ca95f8b5b775 127.0.0.1:30003
   slots:[10923-16383] (5461 slots) master
   1 additional replica(s)
S: 0a0fd7ce1d02609a8068a0bffde9231d25d47ae5 127.0.0.1:30006
   slots: (0 slots) slave
   replicates 90af43c7683b3d160a8e5264b0807843828ae3ea
M: 60a9ac3e4c9f141bae94b59300de9f40262ce2ea 127.0.0.1:30002
   slots:[5461-10922] (5462 slots) master
   1 additional replica(s)
[OK] All nodes agree about slots configuration.
>>> Check for open slots...
>>> Check slots coverage...
[OK] All 16384 slots covered.
여기까지 단 두 번의 Shell실행으로 클러스터가 완성되었습니다.
서비스에서 쉽고 빠르게 생성이 필요할 때 사용하면 될 거 같습니다.
모든 클러스터 중지
stop 명령으로 모든 클러스터를 한 번에 중지합니다. 중지된 후 start명령으로 한 번에 클러스터를 시작할 수 있습니다.
$ ./create-cluster stop
Stopping 30001
Stopping 30002
Stopping 30003
Stopping 30004
Stopping 30005
Stopping 30006
$ ./create-cluster start
Starting 30001
Starting 30002
Starting 30003
Starting 30004
Starting 30005
Starting 30006
모든 클러스터의 데이터 삭제
AOP / log로 생성된 모든 파일들을 삭제하여 클러스터를 초기 환경으로 되돌립니다. 클러스터에 문제가 있어서 다시 구동해야 할 때 유용합니다.
$ ./create-cluster clean

 사용해보기")

